Showing posts with label WORDPRESS TUTORIAL. Show all posts

Thursday, June 15, 2017

FIRST STEPS WITH WORDPRESS

Codex

Attention Interested in functions, hooks, classes, or methods? Check out the new WordPress Code Reference!

First Steps With WordPress

Now What?

You’ve just completed the 5 Minute Installation of WordPress or one-click install from your web host. Now what?
Let’s take a step-by-step tour through your WordPress site and see how the different functions work and how to make your new site your own. During the first part of this tutorial, please don’t change anything within the program unless it is part of the tutorial. After following these steps, you’ll soon be changing everything.

Log In

View Log In Form
Begin by logging into the “administration area” or the back end of your website. Visit your site’s login page by placing “wp-admin” after your domain name (e.g. http://example.com/wp-admin). You can also place “login” after your domain as of WordPress 3.4. Some themes provide a “login” link or form on the front end as well. Now log into WordPress using your username and password.

Start at the Top

View Site Link
After logging in you are on the main Administration Screen called the Dashboard. This is the brain behind your website, the place where you can let your creativity explode, writing brilliant prose and designing the best and most lovely website possible. This is where the organization of your site begins – and this is just the start. At the top of the screen is the area called the “toolbar.” Click on the link that is your site name. This will take you to a view of your new WordPress site. Like it? Don’t like it? Doesn’t matter, just look at it. This is where you are going to be spending a lot of time!

Test Drive Your WordPress Site

twentytwelvedefault1.png
Take time to look at the site before you get into the changing of things and figuring out how all of this works; it’s important to see how the WordPress Twenty Seventeen theme is laid out and how it works. Consider this the test drive before you start adding on all the special features.
The layout you are looking at is called a WordPress Theme. It is the appearance of your website, styling the look of the site and the framing of the content. The WordPress Twenty Seventeen theme features a “header” at the top with the title and tagline for your site. Below this is your Menu. Along the side you will see some titles and links. This comprises Widgets. Within the main middle section of the page is the content area. At the bottom of the page is the footer.
Let’s look at the post for a moment. There is a “title,” and below the title is the date the post was written, then the body of the post, and finally some information about the post. This is called the post meta data and contains information about the post such as the category assigned to that post.
Scroll down the page and notice the bar at the end of the page. This is called the “footer.” It says “Proudly powered by WordPress.”
Back to the sidebar, you will see different sections with information. Among these you may find a list of Recent Posts, Recent Comments, Archives, Categories, and links to the Administration Screens, Log Out, and RSS feeds. This is part of the menu or navigation Screen that people will use to move around your site, visiting posts from different categories or time periods.

It’s All in the Details

Take time to notice the smaller details of this web page layout and design. Move your mouse over the title of the article post. Notice how it changes color. This is called a hover. Most Themes feature a distinctive color or underline when you move your mouse over a link. Move your mouse over any of the links in the sidebar. Do they change? Is the change the same? You can change your link hovers to look different in different sections of your page. Also look at the color of the links. How are they colored or underlined to stand out from the rest of the text?
Observe the small design details and where they are placed within the page. In the near future, you may want to change some of these details, such as the color of the title in the white box at the top of the page. If you remember that it is called the header, then you will know to look within the header section of your style sheet (the file that controls the look of your web page), when you want to make changes to it.

Take a Quick Trip Around

For now you only have one post. It is residing within a page that is laid out as your home page or the front page. If you click on the title of the post, it will take you to the specific page for that post. The first page or home page of your site features the most recent posts on your site. Each post title will link to the actual page of the post. Some Theme designers design their single post pages to look different from the home page. By clicking on the title, you are taken to another web page that looks different from the home page.
Again, in the single post, pay attention to the layout and notice what is now different about the design elements. Is the header different? Smaller, larger, or a different color? Is there a sidebar?
Posts are usually stored in Categories and/or Tags so you can keep related topics together. Right now you only have one category, but will soon want more. Click on the single category that appears in the sidebar of the home page. You are now in a page that has been generated to display only the posts within that category. Again, take a look at the layout and see how it may be different from the home page and the single post.
Do the same with the Archives. You may only have one post, but look at how the page is laid out.
All of these changes are created from only a few files called template files and you can learn more about how they work in Stepping Into Templates. For now, however, let’s get on with how the rest of WordPress works.

Test Drive the WordPress Administration Screens

WordPress Admin Dashboard
Now that you have an idea of how your site looks and what the different layout sections are called, it’s time to test drive the WordPress Administration. This is like familiarizing yourself with the backend of your new website. In fact, the first page you see after logging in is called the Dashboard, a collection of information and data about the activities and actions on your WordPress site.
The Dashboard helps to keep you up to date on new and interesting bits of information from the many WordPress resources. In the corner, it also features a list of the most recent activity you’ve accomplished on your site.
On the left side of the screen is the main navigation menu detailing each of the administrative functions you can perform. Move your mouse down the list and the sub-menus will “fly out” for you to move your mouse to and click. Once you choose a “parent” navigation section, it will open up to reveal the options within that section.
The various menu items are as follows:
The links in the above list will take you to a series of articles that will guide you step-by-step through every aspect of the Admin Screens. You are anxious to get started, so for now, let's start with the Users Screen.
User Profile Screen
Click on the Users tab. The screen will change and you will see the Screen called All Users that shows a list of all your users; from here you can add or change existing users and authors accounts. In the navigation menu, click on the Your Profile menu choice. This is where you will enter information about you, the author and administrator of the site. Fill in the information and click Update Profile when done. Now, let’s look at some other powerful features of the WordPress Admin.

Quick Changing the Look

The Appearance Screen
The Appearance, Themes Screen allows you to change the look of your site using different Themes. Themes are presentation styles that completely change the look of your site. Designed by WordPress developers and users, there are hundreds of themes available for you to choose from. In your Appearance Screen, you will see a list of currently installed themes, including the WordPress Twenty Seventeen theme. To quickly change the theme, simply click on the Activate button under one of the themes listed, then click on your site name in the top toolbar to see how it looks. Wow, you have another look and nothing else on the site has changed. It's that easy.
Go back to the Appearance > Theme Screen and click the Activate button under the WordPress Twenty Seventeen theme to bring the design back to what you had. To see it again, click your site name in the toolbar, and there it is.


Writing and Managing Posts

Add New Post Screen
Back at the Administration Screen, take a look at the Posts Screen. You can use the tabs under the Posts Menu to write and manage your posts. Let’s start by making your first test post in the Add New tab. If the screen looks a little intimidating, the Codex article on Writing a Post will take you step-by-step through the process of writing a post. Take a moment to read through the article and post your first entry and then return to this article and we’ll take you onto the next step.
If you are in a hurry, then simply fill in the blanks, one by one, in the post beginning with the title and then write a little test message in the post window. This is just for a test, so you can write anything you want. When you are done, click the Publish button that is to the right of the post entry window and it is done. You will then see a blank Write a Post screen and you're ready to write another post. Go ahead. But do only three to four entries. There’s more exciting work ahead!
Now that you’ve gotten a feel for writing posts, you can view your posts by clicking your site name in the toolbar on top of the screen. Now it’s time to get down to the real work.

Planning Session

If you want to create a good and solid website, you need a good and solid plan. I know it’s hard to do, and I know you want to keep playing with your new website, but it's time to take a break away from your computer and turn to pen and paper.
On a piece of paper, describe your site. Take five to twenty minutes to come up with a purpose for your site, or better yet, call it your Mission Statement.
Answer the following questions:
  1. What am I going to do with this?
  2. Who is going to read this?
  3. What kinds of information will I be posting?
  4. Why am I doing this?
  5. Who am I doing this for?
  6. How often am I going to be posting and adding information?
Now, compile this information into a paragraph so it looks like this:
This website will be dedicated to X, Y, and Z,

and cover the topics of A, B, and C. The audience will

be __________ ________________ _______. I will be adding

posts every _____________ about ________ _______ ______________.


I am doing this because _____________ _____________ __________________.


Using the Information

From this exercise, we’ve gathered a lot of information. We’ve uncovered information on how you might layout and design your site. If you know your audience is mostly made up of young people under the age of 25, you will probably want a fashionable look ranging from wild colors and crazy graphics to dark foreboding tones. If you are providing factual information about a serious subject, then you will probably want a more conservative look where the information is more important than a lot of pop and flash.
You may already have a design idea in mind, or perhaps you will be copying over from your previous site, but take a moment to use this information to reconsider your design, and to see how what you want will work with the WordPress options.
You have also uncovered the possible categories for your site. The topics and subjects you will be covering are listed in your purpose statement. Let’s say your purpose statement said,
“The website will be dedicated to providing news and information on computers, web pages, and the internet and cover the topics of computer tips, web page design, and internet news.”
Your topics are your categories. Write your categories down below your purpose paragraph and notes about your web page design.
Now, what subcategories might be under these topics? Under Computer Tips, you might want to segregate them by Windows, Linux, and Mac. Or maybe Software and Hardware. You can have sub-sub-categories, but let’s stop with subcategories for right now. Write these down.
Remember the question about why you are doing this? Is it because you have valuable and timely information or knowledge to share, because you want to talk about a subject that interests you, or maybe because you just think it will be fun to do.
Understanding the timeliness of the information you want to present on your site helps you organize the information on your website. Your website is organized by several different methods. If the date of when you posted the information is critical to the success of the page, then having links to your posts referenced by date is important. If the information itself is more important and timeless, then having your posts referenced by category is the best choice.
Have you noticed that you are starting to lay out your website? If you remember our earlier test drive of your new WordPress website, we examined the sidebar menu. This is the area where your past posts are organized. If you take another look, you will see the sidebar is laid out in a list, including Archives by date and Categories by category. It may even feature a calendar.
As you lay out your website on paper, consider whether you want both categories and dates, or just one of them in your sidebar. What information you have and how you want to help the user find the information is critical to your website design.

What Information Do You Want to Share

As you think about what information the user will need to know, you have to consider what information you are willing to share with them. That information may include how to contact you, what the purpose of the site is, who you are, and what your expertise is.
A WordPress feature called Pages makes the process of presenting this information easier. Pages, similar to posts, are most commonly used to present unchanging information such as About Us, Contact Us, Sign Up for Our Mailing List, and other static information. Before creating your individual Pages, you need to think about what information you would like the Page to hold. Write down the possible Page titles and describe the information you want to share on each Page.

Comments

Part of the fun of WordPress is the ability to have viewers leave comments on your site. It creates a dynamic interchange between you and the viewer. Do you want comments on your posts? Comments on posts come in a variety of forms, from pats on the back (Good job! Like the post!) to extensive conversations and commentary about the posts. Or maybe you are seeking comments that add to the information you’ve posted.
Responding to comments and moderating them can also take up a lot of time. If they are critical to your site, then include them and consider how you want them presented. Go back to your test site; the first post created at the time of installation included a sample comment. You can even make a few comments yourself on the posts you created. Take a look at how they are laid out and consider how you might want them to look to fit into the design and layout of your site.
When you have reached your decision about how you want to handle comments, take time to read through the article on comments and WordPress discussion options to help you set those features.
With this basic information, you are ready to return to your computer and start setting up your site.

Setting Up Your Site

Before you get to the graphic look of your site, let’s do a little more administration to your site to set it up. Consider making your first plugin installation the Enhanced Admin Bar with Codex Search. It allows you to search both the WordPress Codex and WordPress Support Forum from your WordPress Administration Screens. Click on one of the search results and the page will open in a new window or tab so you can have the article or discussion open while working on WordPress. This will make your transition to WordPress a much gentler one with information right at your fingertips. You can also work from this page by clicking on a link with a Right Click and opening the documents in a new window or tab, so you can read along as you work on your site.
You may also want to install plugins such as Jetpack by WordPress.com to supercharge your website, and don’t forget to activate the Akismet WordPress Plugin that is available with all WordPress sites to help protect it from comment spam.
But now, let's start with making those categories you wrote down before.

Create Categories

In the Posts > Categories tab, in the Add New Category area, fill in the information about your category. Continue to add your parent categories, going down the list. Hold off on entering subcategories until all the main categories are entered.
NOTE: You can add any new categories at any time, but make a note of the fact that categories can be sorted in WordPress in two ways: by name (alphabetically) or by ID number. As you enter the categories, they are assigned an ID number. It is difficult to change this, so if you don’t want your categories sorted alphabetically, enter them in the order you want to see them presented on the screen.
WordPress Admin Categories
When you have the parent categories entered, enter your subcategories. In the pull down menu for Parent Category, you can select the parent to the subcategory you are adding. When you view your categories in the Manage > Categories Screen, you will see the categories listed like this:
Computer Tips

- Windows
- Linux
- Mac
Internet News
Web Page Design

- Web Standards
- WordPress
- - Plugins
- - Themes

Put Posts into Categories

Let’s put some of your test posts into categories so you can see how this works.
WordPress Admin Posts
From the Posts > Category Screen, click on the tab for All Posts. You should see the test posts you entered here. When you hover your mouse over each post title, under the title, you should see the Edit | Quick Edit | Trash | View links. Click on Edit to edit one of the posts. On the right side of the Edit Post screen you will now see your Categories. Choose one of them by clicking in the box next to it. Then in the Publish module above, click the Update button. Repeat this for your other test posts, putting each one in a different category. Now view your page by clicking on your site name in the toolbar at the top of your Administration Screen. Do you see the categories listed in the sidebar now? Great. If you are missing a category, that usually means that there are no posts in it. This is the default function of WordPress, so not to worry. When you add a post to the “missing” category, it will appear on your web pages. Click on one of the categories and you will be taken to a page for just that category. You should see the posts that went into that category. This is a generated Category page.
Now, click on the Archives for the month showing. Now you are visiting a generated page of your posts listed in chronological order for this month - well, specifically for today only. Two methods of finding the same information.

Preventing Spam

There is more to think about when it comes to having comments on your site. Unfortunately we live in a world where spam is a fact of life. It is recommended that you begin battling the comment spammers with the helpful article, Introduction to Dealing with Comment Spam.

What Is Next

You’ve now done all the basics for your new WordPress website. You know how to write a post, create a category, and how to view your site’s information by category and archive. You can start the customization process, and when you are done, don’t forget to delete your test posts! Then start writing some wonderful information to share with your new-found public!

Customizing Your WordPress Site

Once you are familiar with how WordPress works, it's time to get creative and start customizing. The tutorial now splits into different subjects that require no order. From here on you can do whatever you want, adding and subtracting, perfecting and scrambling your site at will. The amount of effort you put into the site is now up to you. You can work with the two WordPress Themes that came with the installation, or seek out another Theme that better meets your needs. Or you can create your own Child Theme. You can totally customize all the links and information, or get serious and completely re-design the entire site to do whatever you want. You have the basics, the rest is up to your imagination.
Finding a WordPress Theme
Look for one that better suits the look you desire on your site.
Customizing the Look
When you are ready to plunge into the code, you can customize the look and layout of your site through CSS and modifying the Themes (or create your own). If your customizing goals are not seriously extensive, a good bet would be to develop your own Child Theme. A minimal Child Theme is a fairly simple project if you have a little coding experience.
Enhance Your Site with Plugins
Plugins add function and sometimes fun to your site. There are hundreds of different plugins for adding custom links like related articles to your sidebar to adding weather reports. Just like Child Themes are an easy way to customize the look of your site, with a bit of coding experience, your own minimal Plugin is an easy way to change how your site works.

WordPress Themes

There are hundreds of WordPress Themes to choose from. All do basically the same thing but graphically present the information in a myriad of ways. Choose a few that look interesting to you, and meet your audience's needs and your desires, and then test drive them following the test drive instructions above. Click through the whole site, the categories and archives as well as the individual posts to see how the Theme handles each one. The look may be nice on the front page, but if it handles things in a way you don't like in the single post, then you will have to dig into the code and make changes. Not ready for that, try another theme.
If you run into problems, check out the Codex's Troubleshooting Themes article.

Customizing The Look

If you are familiar with CSS, HTML, and even PHP and MySQL, consider either customizing the Theme to your own needs, or creating your own Child Theme. This is not for the timid, this is for the informed and experienced. That said, a Child Theme is an easy, safe way to tinker under the hood/bonnet of WordPress. If things go badly with your customizations, simply activate an approved, unmodified theme and your site is up and running and looking perfectly again. If you want to expand your website design and development skills, the Codex can help:

WordPress Plugins

Plugin Screen
WordPress Plugins are also known as add-ons or extensions. They are software scripts that add functions and events to your website. They cover the gamut from up-to-date weather reports to simple organization of your posts and categories. Plugins are designed by volunteer contributors and enthusiasts who like challenges and problem solving. They are usually fairly simple to install through the WordPress Admin Plugin Screen, just follow the instructions provided by the plugin author. Remember, these are free and non-essential. If you have any problems with plugins, contact the plugin author's website or plugin source first, then search the Internet for help with that specific plugin, and if you haven't found a solution, then visit the WordPress forums for more help.

Customizing How It Works

If you are familiar with PHP, HTML, and maybe even MySQL, you may be able to customize WordPress to work the way you want. Again this is not for the timid, this is for the informed and experienced. And again, a simple basic Plugin is an easy, safe way to tinker under the hood of WordPress. If things go badly with your customizations, simply deactivate your balky Plugin and your site is up and running perfectly again. If you want to expand your website development skills, the Codex can help:

Above and Beyond the Basics

The exciting thing about WordPress is that there are few limits. Thousands of people are using WordPress for blogging and for running their websites. For example, look at some of the entries under the WordPress.org Theme Showcase. All have a different look and different functions on their sites.
What you do from here is up to you, but here are a few places to take that first step beyond the basics:

Getting More Help

WORDPRESS TUTORIAL


WordPress Tutorial
In this WordPress tutorial you will find everything you need in order to create a website with WordPress. From installation to backups – we have covered it all. Be sure to check out the list of our newest WordPress tutorials at the very bottom of this page.
WordPress first saw the light of day on May 27, 2003. The founders of this software are Matt Mullenweg and Mike Little. WordPress can be referred to as an online, open source site building tool based on PHP and MySQL programming languages. In more advanced terms it is called a content management system (CMS). When WordPress was first launched it had several users but over time grew into the biggest and most popular CMS in the world. Today, WordPress is powering over 75 million websites. A research carried out in April 2016 shows that this content management system was used by more than 26% of the 10 million best ranking sites.

Why WordPress is so popular

After finding out the amount of users WordPress has, it may leave you wondering, why is it so popular? A mixture of several factors should be taken into account. The general viewpoint is that WordPress is a simple blogging tool, however, it is much more than that. Due to the fact that WordPress is an open source project, it allows anyone to improve and edit its code according to one’s liking. It also features thousands of free plugins, themes, widgets and other tools. All these features allow you to create any type of website, starting from simple blogs, personal websites or portfolios, ranging to e-shops, knowledge bases or job boards. Another factor is that WordPress is completely free and supports all hosting platforms with PHP and MySQL. On top of that, this CMS is constantly updated with new versions which improve security, include new features and improve overall performance. Last, but not least, WordPress has a huge community with dedicated forums and discussions all over the internet. The amount of data that is available and thousands of WordPress tutorials also make WordPress one of the easiest to use content management systems out there.

What is a CMS

A content management system or CMS for short is an application with the ability to create, modify and publish digital content. In most cases, it also supports multiple users, allowing them to work in collaboration. For example, in WordPress it is possible to create several administrative users, each one having different privileges. Content management systems also include text and formatting features, the ability to upload videos, photos, audio, maps or even your own code.
A content management system consists of two major components:
  • A content management application (CMA). The CMA can be referred to as the graphical user interface (GUI) that lets a user create, modify, remove and publish content without ever needing to have knowledge of HTML or other programming languages.
  • A content delivery application (CDA). The CDA is responsible for the back-end services that manage and deliver content after it is in the CMA.
Other features worth mentioning are:
  • SEO-friendly URLs
  • Online support and communities
  • User/group functions
  • Various templates and designs
  • Installation wizards and upgrades/updates
The three most popular content management systems in the world are WordPress, Joomla, and Drupal.

WordPress.com vs. WordPress.org

WordPress.com and WordPress.org are two ways of hosting a WordPress site. The thing that varies with these two methods is the actual host. By using WordPress.org, you may download the script free of charge and host it yourself on a local machine or with a hosting provider (such as Hostinger). On the other hand, WordPress.com takes care of all that by hosting the site for you. You don’t have to manage a web server, pay for hosting or download software, however, ads are shown on your site.
Both WordPress.org and WordPress.com have certain pros and cons.
If you are not interested in having your own hosting or managing a web server, then WordPress.com may be the way to go. It is free and can be quickly set up. You will also have various features and options for your site’s customization. However, it comes with a price. Your website will include WordPress.com in the URL and you will not be able to upload custom themes or plugins. The ability to edit or modify PHP code behind your site will also not be possible.
Using a self-hosted version from WordPress.org provides more flexibility and control over your site. You will be able to use your own domain name, upload themes, plugins and install them. You will also have the access to your WordPress files, database, and code, meaning that you will be able to modify it according to your liking. The most popular and powerful WordPress sites are self-hosted, as it provides greater flexibility and the ability to implement custom functionalities, codes, and designs. Last but not least, in case WordPress is not the CMS for you, having your own hosting account will allow you to test other content management systems such as Drupal or Joomla.
This WordPress tutorial will focus on the self-hosted WordPress version.

Step 1 – Installing WordPress

One of the reasons why WordPress is so popular are the low system requirements needed to run this CMS on a web server:
  • PHP version 5.2.4 or greater.
  • MySQL version 5.0.15 or greater or any version of MariaDB.
You would probably have to search for a hosting provider which lacks WordPress support. Many hosts use various auto-installers to make the WordPress installation process as simple as possible. By using auto-installers, users no longer have to deal with database creation or file uploading.
In this part of our WordPress tutorial you will learn two different ways to install WordPress.
Before proceeding with WordPress installation, you need to decide on how you want to access your website. Do you want WordPress on your domain name root (example.com), subfolder (example.com/blog) or subdomain name (blog.example.com)? Only if you want to setup WordPress on a subdomain name, you will have to take an additional step and create a subdomain name. On Hostinger this can be easily done in the Subdomains section.

Option 1.1 – Installing WordPress on Hostinger by Using Auto Installer

Let’s start with the simplest and fastest way to install WordPress – Hostinger auto installer. The steps below show how to install WordPress on Hostinger control panel:
  1. Access Hostinger control panel.
  2. Locate Auto Installer and open it.
  3. Enter WordPress in the search field and click on its icon.
  4. Now fill in website details:
  • URL – The URL where WordPress should be installed. If you want to install it on root domain name (example.com) then leave it empty.
  • Language – Choose WordPress language.
  • Administrator Username – Your WordPress admin username. You will use it to access WordPress admin area.
  • Administrator Password – Your WordPress admin password. You will use it to access WordPress admin area.
  • Administrator Email – Enter your email address.
  • Website Title – The title of your WordPress website.
  • Website Tagline – A short sentence explaining what your website is about.
  1. Press Install button.

Video Player

Option 1.2 – Installing WordPress Manually

If you want to understand the basics and learn how WordPress works, you can install it manually. WordPress is famous for its 5-minute installer. The process is straightforward and similar to any other software installation. So if you have ever installed any computer program – it won’t be hard for you to complete the WordPress installation.
What you need before proceeding:
  • FTP client or File Manager
  • Latest Version of WordPress
First of all, download the latest WordPress from the official WordPress.org website.
WordPress Download Button
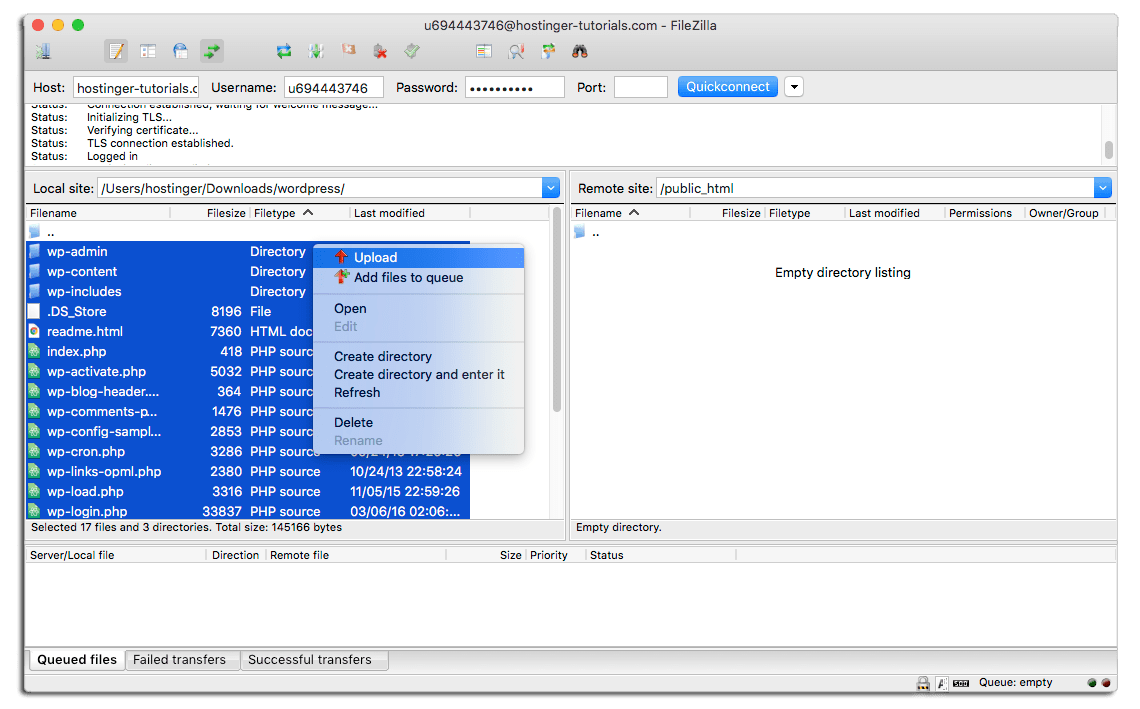
Once the download is complete, you can start uploading WordPress files to your hosting account. You can use either a File Manager, provided by your hosting, or an FTP client. There is no difference which tool you will use to upload WordPress files. The only thing that you should take into account is the destination directory. For example, if you want to have WordPress on a root domain name, files should be uploaded to the public_html folder; if you want to serve WordPress from a subdomain name or a subfolder, upload the files to the appropriate directory.
Uploading WordPress Files With FileZilla
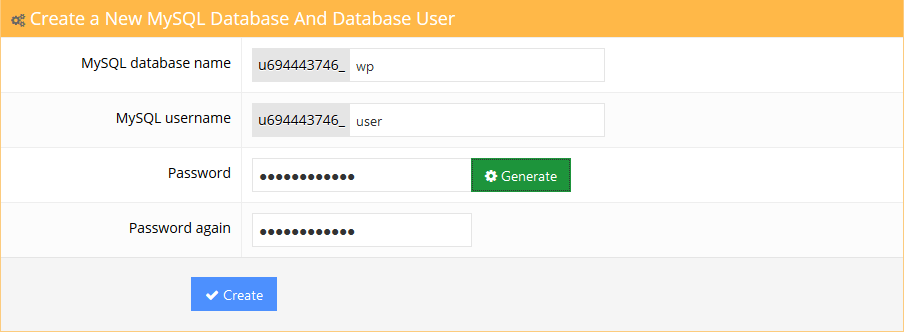
WordPress stores information in the database. Thus, it’s mandatory to create one. On Hostinger, a new database can be created in the MySQL Databases section. Be sure to write down the database details as you will need them later.
Hostinger Control Panel Creating Database for WordPress Installation
Now visit your domain name in order to start the installation process. You’ll be asked to fill in the MySQL database information, administrator details and the site information.
Video Player
For more detailed instructions, see the tutorial on how to install WordPress on different hosting control panels. In order to find out how to migrate WordPress, see this tutorial.

Step 2 – Navigating in WordPress Dashboard

Once the installation is complete, the first thing you would want to do is log in to the WordPress administrator dashboard. Usually there is a link to the login page on the front end of WordPress blog. However, some themes don’t have this link. In this case, the easiest way to log in to WordPress is by adding wp-admin at the end of your website’s address like this:
http://www.yourdomain.com/wp-admin
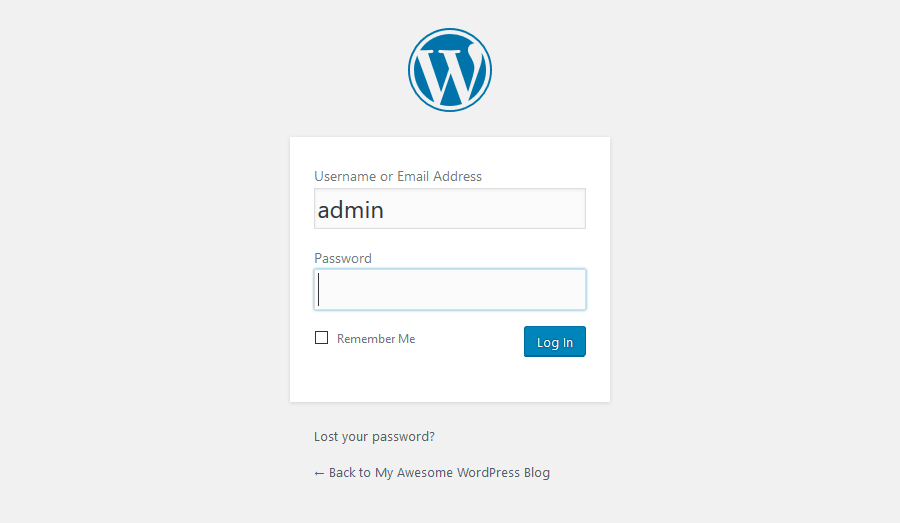
This URL will direct you to the login screen where you will be asked to enter the administrator’s username and password. Remember, you have entered these details during WordPress installation. If you have forgotten your password, click on the Lost your password? link. More detailed instructions on how to login to WordPress can be found here.
Logging into WordPress Dashboard
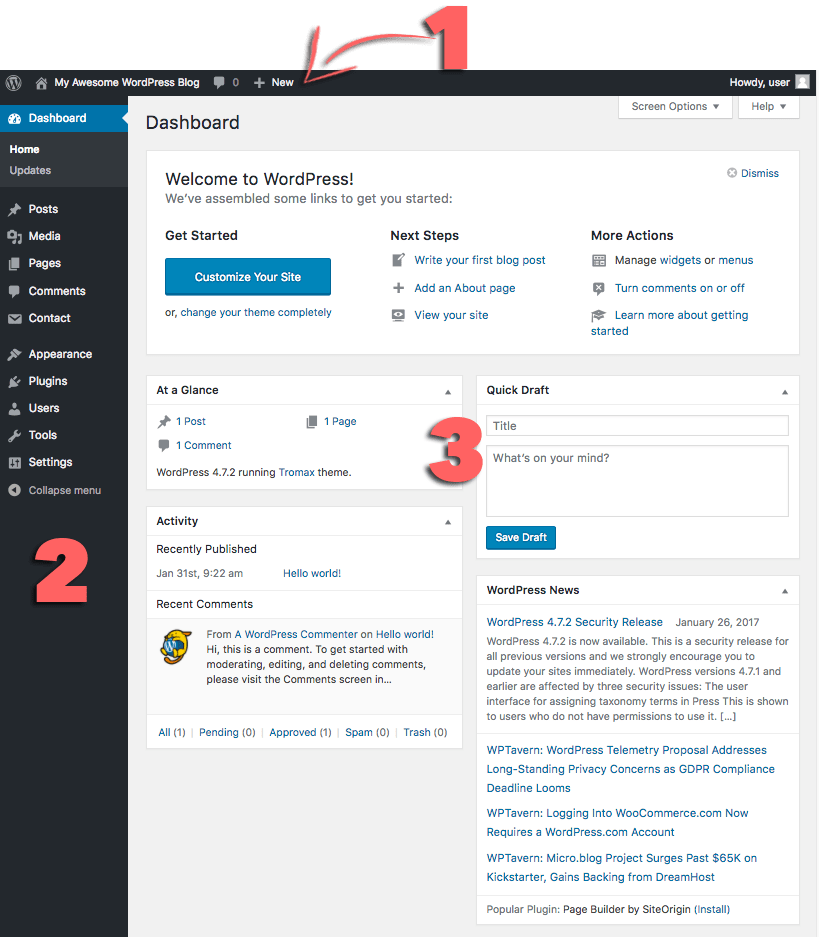
After logging in, you will see the administrator dashboard. It’s built to give you an overview of your entire website and contains 3 main sections:
WordPress Dashboard
  1. A toolbar at the top of the page. It contains links to the most commonly used administration functions and resources. For example, if you hover over your website’s name, you will get a link to the public view of your site. It also displays simple notifications like updates and new comments count.
  2. The main navigation menu on the left-hand side. It contains links to all administrative screens of WordPress. If you hover over a menu item, a submenu with additional items will be displayed.
  3. The main work area.
The first time you log in to the WordPress admin panel, you will see a welcome module which contains some useful links to help you get started. Once you are comfortable with the dashboard, press the Dismiss button in order to hide this module.
Other Modules:
  1. At a Glance box will tell you how many posts, pages and comments you have. It also shows WordPress version and theme you are running.
  2. Activity box gives you a bit more information about your latest posts and comments. It shows the status of all comments and a short list of the most recent comments.
  3. Quick Draft box. Entering content into this box will start a new blog post. However, you cannot publish one from here as this box is only for taking blog posts ideas for you to come back to later.
  4. WordPress News. This module displays the latest WordPress news.
Each of these windows has little arrows which you can use to quickly hide the box. You can also drag and drop them to different positions.

Step 3 – Publishing Content

Creating a website with WordPress starts with publishing a new post or a new page. You may wonder – what is the difference between posts and pages?
The answer is simple. WordPress posts can be categorized, tagged, archived. WordPress posts are used to publish time-sensitive content. In contrast, pages are mainly for static, dateless content. They don’t have categories or tags. Contact us or About pages are good examples of pages.

Step 3.1 – Creating a New Post

To create a new WordPress post open the Add New section under Posts or choose New -> Post option from the top toolbar.
You will be presented with an editing screen with an array of posting features. The first thing you should do is enter a title for your post. Secondly, enter the actual content of your post in the field below. If you want to format your text, use the toolbar options. It’s similar to the one you can find in MS Word or any other popular text editor.
At the right-hand side of the screen, you can see the so-called meta-boxes. Each box has a particular function.
  • Publish. Here you can change the status and visibility of your post, schedule it. By clicking the Publish button your post will go live. If you decide to delete the post, press the Move to Trash button.
  • Categories. On this box you can assign your post to a specific category. You can even create a new one by pressing the + Add New Category button.
  • Tags box allows to quickly add new tags.
  • Featured Image. Here you can assign a featured image to a post. It will be visible at the very top of the post (image location can be different depending on theme).
Video Player

Step 3.2 – Creating a New Page

In order to create a new WordPress page, open the Add New section under Pages menu or click New -> Page button at the top toolbar.
Add New page section has identical WYSIWYG text editor just like the Posts section has. Thus, the process of text input and formatting is the same.
You may also notice that Pages section does not have Tags and Categories meta-boxes. Instead, it has a box called Page Attributes. In this section, you can change the order of your pages and set parent pages. This is useful if you want to have several pages under one parent page.
Video Player

Step 4 – Installing WordPress Plugins

The primary purpose of WordPress plugins is to expand WordPress functionality. Just by installing and activating a plugin you can add new features to WordPress site without any coding. There are thousands of free and paid plugins built for different purposes: from social media sharing to security. Thus, you will surely find a plugin that fits your needs.
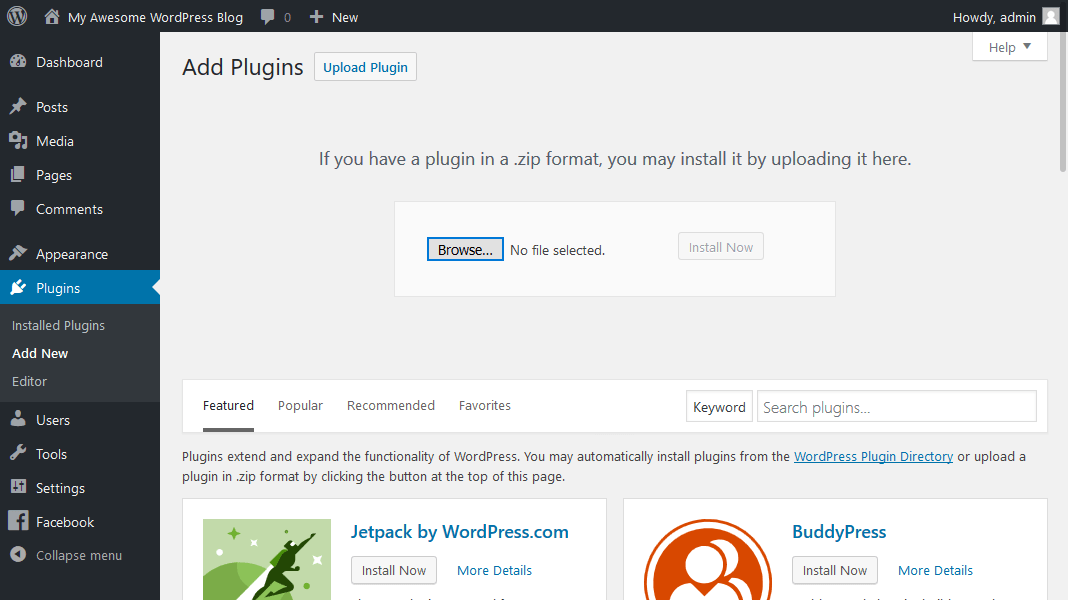
Installing WordPress plugins is an easy task even for a beginner. Free and freemium plugins are available on WordPress.org plugin directory. Just like themes, these can be installed by using the inbuilt WordPress installer. To install a WordPress plugin press the Add New button under Plugins and enter the name of the plugin you want to install in the search field. Hit Install and then Activate button.
Video Player
There are thousands of premium (paid) WordPress plugins which cannot be installed from the official WordPress plugin directory. If you purchased a premium plugin, you would have to manually upload it to WordPress. The process is quite similar to themes installation. To proceed, press the Add New button under Plugins and hit Upload Plugin. Now select a plugin archive and upload it. Finally, install and activate the plugin. If you need a detailed guide, see this tutorial
WordPress Plugins Manual Install

Essential WordPress Plugins

There are so many WordPress plugins – it could be hard to choose the right one. In fact, many of the plugins serve the same purpose, for example, there are dozens of WordPress caching plugins. That is why we decided to list the best WordPress plugins that are essential for every WordPress blog.
  • Google XML Sitemaps. This plugin will automatically generate XML site maps for better search engine optimization. It’s easy to use and update it regularly.
  • Yoast SEO. Probably the most popular SEO plugin for WordPress. It will help you improve the search engine optimization. From meta tags to writing suggestions – Yoast SEO plugin has it all.
  • Wordfence Security. This plugin will keep your WordPress safe from hackers and malware. It has firewall and malware scanner modules which are super useful.
  • Contact Form 7. Simple but very powerful WordPress contact form plugin. Create any contact or even lead generation forms with this plugin.
It’s not recommended to clog Wordpress with dozens of plugins as it can decrease site’s performance. Keep your WordPress clean by installing only essential plugins and delete the ones you are not using.

Step 5 – Installing WordPress Themes

The look of WordPress site can be changed by applying themes. There are free and premium WordPress themes. Some of them are universal and can be used on any website. Others are built for a very specific purpose, for example, the e-commerce themes.
WordPress made theme installation super easy. It literally takes just a few minutes to install free WordPress themes. In order to proceed, access the Appearance section and search for a nice looking theme. You can even filter themes by features or colors.
Video Player
Theme preview feature lets you see how your website will look with a selected theme. This is useful, as it will save your time – you will not have to install multiple themes just to find the theme that fits your needs.
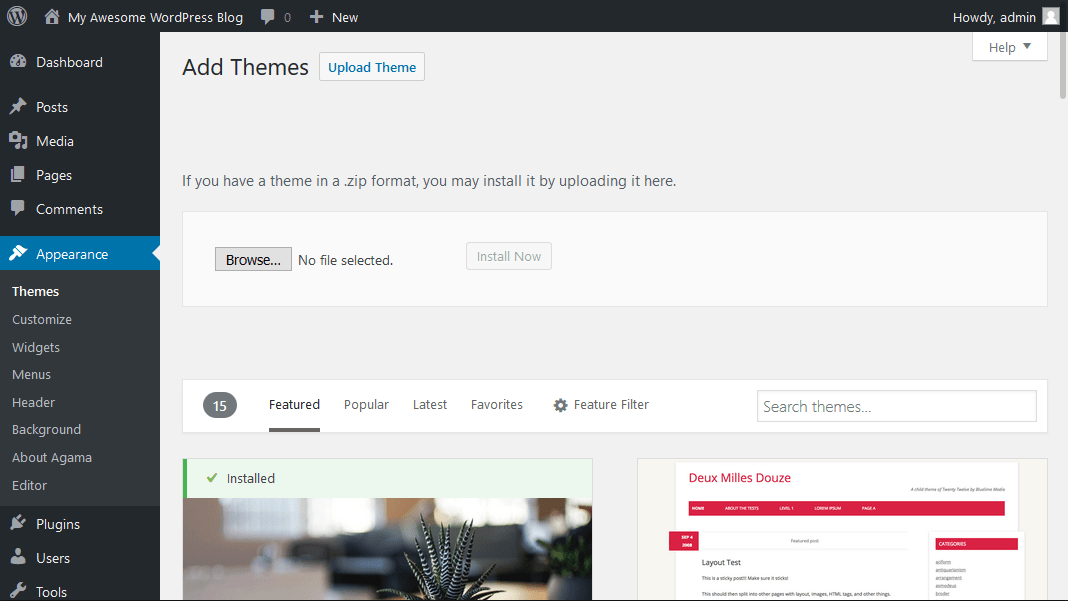
The above method is suitable for free and freemium themes only. What if you purchased a nice looking premium theme? In this case, you will have to upload the theme files manually. Access the same Appearance section, press the Upload Theme button and select the theme’s .zip file. It can take up to a few minutes for the uploading process to complete. Once it’s done, simply Activate the theme. Need exact steps? See a comprehensive tutorial on how to install themes.
WordPress Upload Theme

Step 6 – Optimizing WordPress Performance

In this WordPress tutorial we have now learned how to install and use WordPress in order to create and manage your very own website. As your WordPress site grows, so does the amount of text, images, code and other media files. A bigger website means that it will take longer to load. To avoid slow response time in WordPress, you should also invest some time in optimization. It will ensure that your pages load quickly and efficiently, thus, leaving your visitors happy and wanting to come back for more. Everyone has encountered a slow website at least a few times and felt the frustration that comes while waiting endlessly for it to load. Taking that into account, spending some time to improve your WordPress speed is a really good idea. The best part about WordPress is that it’s really easy to optimize due to the amount of plugins and other tools available. You can make your WordPress site lightning fast without even having any coding knowledge at all. To get you on the right track, we will cover a few WordPress optimization techniques that will provide a notable speed boost to your website.

Step 6.1 – Using WordPress Caching Plugins

The first step in optimizing your WordPress site is setting up a WordPress caching plugin. Is short, a cache is a temporary data storage. In most cases, active data is cached which results in reduced loading times. For example, when you access a frequently visited site, your browser will have a portion of the site’s static content located in its cache. As a result, the browser needs to request fewer files and information from the server which ultimately leads to quicker loading. WordPress caching plugins work by creating a static version of your website and delivering it, instead of loading all PHP scripts every time when someone refreshes or re-enters your site.
Most popular WordPress caching plugins are:
You may find a detailed guide on how to implement WP Super Cache plugin for your WordPress site here.

Step 6.2 – Optimizing WordPress Images

Image optimization is another crucial task that should be done in order to make your WordPress site fast. Generally, there are 2 main issues that cause images to load slowly:
  • Using too large images. For example, you upload a 500 x 500 dimension picture but your site resizes it to 100 x 100. As a result, the visitor’s browser will have to download the larger file first, scale it down and only then display it. The proper way would be to simply upload a 100 x 100 dimension picture so that the excessive task of scaling down the image would be avoided. The image would also take up less space that way, resulting in an overall boost of speed. A detailed guide on how to locate such images and scale them down can be found here.
  • Images are not fully compressed. You can save lots of space and bandwidth by properly compressing your images. Luckily, WordPress has a really great plugin that can help you with that, it’s called WP Smush. You can find a detailed guide on how to implement this plugin and optimize your WordPress images here.
The more images your WordPress site has, the more beneficial this optimization task will be.

Step 6.3 – Enabling gzip Compression for WordPress

Enabling gzip compression for a WordPress website is a great way to increase speed and performance. In short, gzip compression works by finding similar strings in a text file and replacing it temporarily, resulting in a smaller file size. HTML and CSS files have a lot of repetitive text and spaces, making gzip compression very effective. On the whole, it can reduce the size of a WordPress page by up to 50-70%.
There are a few ways to enable gzip compression:
  • Enabling gzip compression via .htaccess file (recommended). A more detailed WordPress tutorial can be found here.
  • Enabling gzip compression via WordPress plugins, such as GZip Ninja Speed.
One thing that you should keep in mind is that gzip compression may slightly increase CPU usage. If CPU is not an issue, then gzip compression is a really great way to optimize your WordPress site.

Step 6.4 – Deferring parsing of JavaScript in WordPress

Most themes, plugins and social media add-ons use a lot of JavaScript which is by default loaded first when accessing a site. This will make the HTML and other visual contents appear only after the JS is loaded. You can defer parsing of JavaScript so that the visual elements appear faster, while various social media buttons and other content that uses JavaScript would be loaded afterwards. This is one of the techniques recommended by Google Developers that is often overlooked. In WordPress, you can easily do that by using plugins such as WP Deferred JavaScripts or Speed Booster Pack. A more detailed tutorial on how to implement these tools on your WP site can be found here.

Step 6.5 – Using a Content Delivery Network

Implementing a content delivery network (CDN for short) will speed up WordPress by caching content in multiple datacenters around the world. After a visitor enters your site, the content will be delivered by the nearest datacenter available resulting in a better front-end experience. CDNs also work great with WordPress caching plugins and there are free solutions to get you started. For example, CloudFlare has a free plan which provides both benefits of a CDN while protecting your site from DDoS attacks. For step-by-step instructions on how to implement it on WordPress you can check this WP tutorial.

Step 6.6 – Removing Query Strings from Static Resources

GTMetrix and other optimization tools suggest removing query strings from CSS and JS in order to improve caching of those elements. The previously mentioned WordPress plugin Speed Booster Pack is among a few others that can help you with this task. For more specific information you may refer to this guide for WordPress.

Step 6.7 – Enabling Lazy Loading

Generally, when a web page is opened, all the content is loaded instantly, which is called eager loading. Alternatively, it is possible to delay the initialization of some objects (such as images) until they are needed, which is called lazy loading. The most common practice is displaying images only when they are visible from the visitor’s viewpoint or in the screen. All you need to do in order to take advantage of this technique is install and enable a plugin such as Lazy Load or Rocket Lazy Load.

Step 7 – Keeping WordPress Secure

Last but not least, in order to have a successful WordPress site, you must harden its security. Just as WordPress is the most popular CMS in the world, it also turns out to be the most hacked. However, there are a few things that you can do in order to protect your site against hacking and other malicious activity.

Step 7.1 – Keeping WordPress Updated

One of the most important factors in having a safe environment is to always update and use the latest version of WordPress, themes and plugins. Most updates include security tweaks, vulnerability fixes and prevent them from being exploitable in the future versions. A common practice among hackers is taking advantage of web pages that are running an outdated version of WordPress with a known vulnerability. By default, WordPress is updated automatically upon the release of a new version, however, it may not always work or the feature may be disabled on some hosts. Generally, when a new version of WordPress arrives, a notification will be shown at the top of your Dashboard. You may also update your themes and plugins via Dashbard-> Updates section.
WordPress Updates in Dashboard

Step 7.2 – Using Unique Usernames and Passwords

Admin is the username set by default in all WordPress installations. It is highly recommended to change it, as it will add an extra layer of security to your login credentials. Imagine a situation where someone knows your password, however, they are not aware of the username. The end result is that the person will still be unable to access your dashboard because they do not know the username. Leaving the value as admin can make the hacker’s job that much easier, therefore it should always be changed.
When setting up a password, make sure to include numbers, capital letters and special symbols. In case you are having difficulties keeping track of all the passwords, you can store them using such tools as Last Pass. It will save the trouble of remembering all the different passwords while allowing you to go wild on the password difficulty.

Step 7.3 – Backing up WordPress

Generating backups is a crucial task for any website. Not only will it increase your security, but will also provide you with a reliable way of restoring your site in case of unexpected errors or issues. You can perform a backup manually or use automation. The manual process would involve downloading the files and the MySQL database of a WordPress site. However, if you make lots of new posts, changes or manage several different websites, downloading everything manually each time can be a real hassle. In addition, nowadays, most hosting providers offer automated account backups. As an extra security measure, you can use WordPress plugins to automate backups monthly, weekly or even daily. They will save you lots of time and also give the option of storing the backup WordPress files and database to a remote location such as DropBox.. You can use such plugins as:
  • UpdraftPlus a plugin with the ability to backup WordPress to a remote location and restore it.
  • BackUpWordPress is a light-weight backup plugin with automation. It allows you to exclude certain folders, schedule the execution time and has support for several different languages.
These are some of the basic steps that you can take in hardening WordPress. For more security tips and tricks you can refer to our guide on how to secure WordPress.

Conclusion

In this WordPress tutorial, we have learned about the history, structure of this CMS and types of WordPress hosting. Two installation methods were covered with a short tour of the dashboard, post, plugin and theme management. To get a good head start, we have also overviewed the most crucial WordPress speed and optimization techniques with a few security tips. If you want to continue learning about WordPress, check the