Saturday, July 8, 2017

HOW TO START A PROFITABLE BLOG


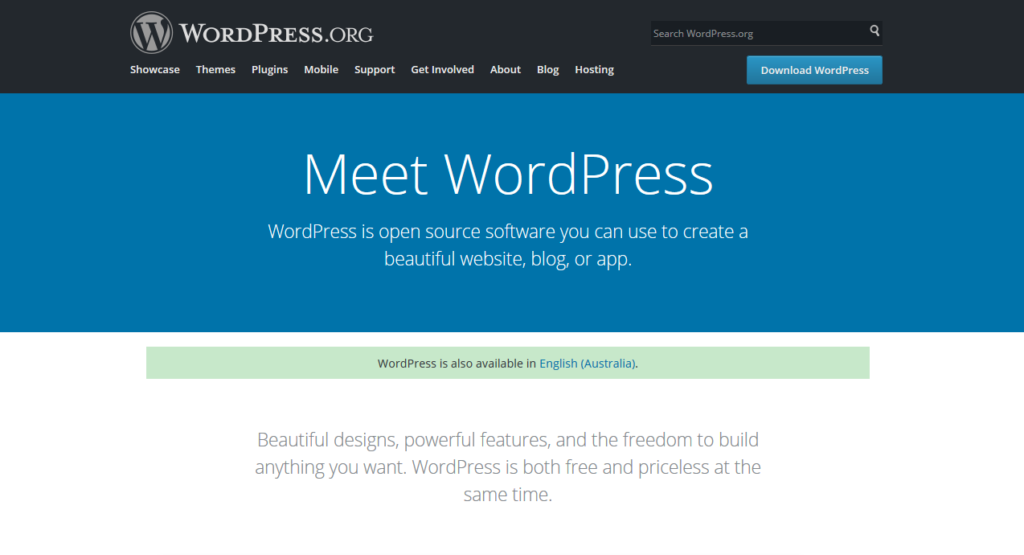
Step 1: Choose the right blogging platform (WordPress)


Before you can even start worrying about how your blog will look like, you’ll need to choose your blogging platform. WordPress, Tumblr and blogger market share
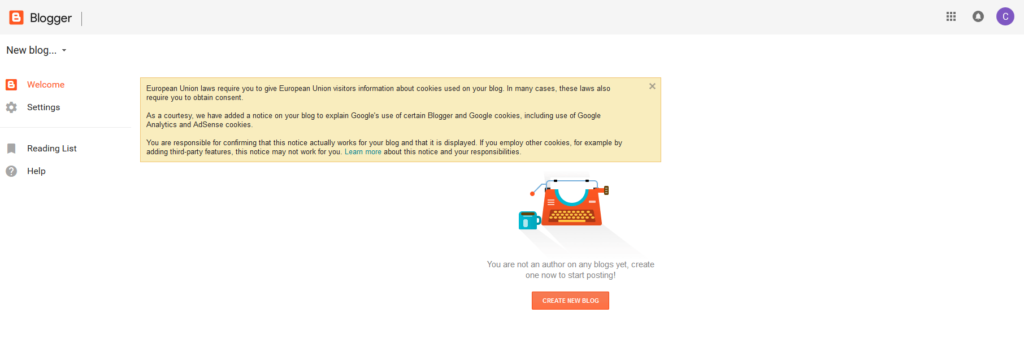
There’s a lot to choose from. You are able to create a blog with many different blogging platforms, such as WordPress, Tumblr, Blogger and more…
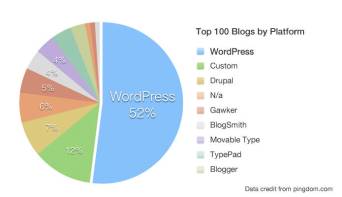
However, given that there are over 72 million active users using WordPress today, it’s clear which platform is the boss. Even my own blogs and sites are built with WordPress blogging platform. Here’s why:
  • It’s FREE for everyone to use (including themes, layouts and add-ons that many other blogging platforms don’t provide).
  • It’s super easy to set up.
  • It’s secure; WordPress is always updating their software and keeping everything sound and secure, so there’s rarely a worry of having your blog come under hacking attacks. No wonder Facebook, NASA and even university blogs are using WordPress.
  • It’s HIGHLY customizable. There are hundreds of free themes and plugins that add more functionality to your blog, from contact and subscribe boxes to plugins that improve blog performance and more.
While the other blogging platforms are generally all pretty OK, nothing in my opinion has ever come close to matching the freedom and customization options that WordPress offers. So without a doubt, go with WordPress. Especially when you are just starting out.

Why you shouldn’t create a blog on a free blogging platform

Without a doubt, you need to self-host your WordPress blog.
Think about it – what famous, successful blogger you know is using a free blogging website like “startbloggingonline.freeblogs.com” instead of their own domain name like “StartBloggingOnline.com”, for example?
It’s not just that – free blogging platforms have other problems too – including…
  • You don’t control your content – the blogging platform does. They could shut you down any time, and for any reason. Don’t believe me? Read this.
  • The web address of your blog will be long and hard to remember (like yourfreeblog.blogspot.com) instead of a catchy, branded address you choose.
  • You’re not allowed to advertise on most free blogging platforms, making it much harder to ever make money from blogging.
All of these limitations apply to the WordPress.COM blogs. What you really want is to self-host a WordPress blog – it’s the same software without all the limitations!
If I were you, I’d start with a self-hosted blog on my own domain from day one. Setting up a blog like this is WAY easier and less expensive than you think.

Finding a domain name and web hosting provider

Now to exciting part! To set up a self-hosted blog on your own domain name, you’ll need two things:
Domain name – This will be your personal blog address where people find you over and over again. For example Google’s Domain is www.Google.com. Your new blog domain name will be www.YourBlogName.com, except you’ll choose what’s going to be behind YourNewBlog. The cost of a domain name is usually $10/year, but if you follow this guide all the way, I’ll show you how to get one for much cheaper.
Web hosting – This will be the home of your blog address and content that’s on the blog. Without web hosting, you’ll be unable to use your domain. Think of it as a computer hard drive that stores all your content on your blog (images, blog posts and so on). The cost of web hosting is usually somewhere between $2-5 per month.
It’s less than an XL coffee at Starbucks, so it won’t break the bank. But it’s an important investment to your blog success.

Where should I get my domain name and hosting?

When it comes to hosting, there are only two things that matter.
  • Page load speed – The average amount of time (in seconds) it takes your blog to load.
  • Uptime – 99.9% isn’t enough (it’s 42 minutes of downtime per month). You should be aiming for 100%.
There are hundreds of different web hosting providers. They all offer you a similar service (domain + hosting) with a similar price, but since I’ve dealt with and monitored many famous and recommended web hosting companies like Bluehost, iPage, Godaddy etc…
I now only use and recommend www.HostGator.com for domain names and web hosting.
Why? Nothing has ever come close to HostGator in terms of blog load speed and uptime (see below):
My blog hosting performance
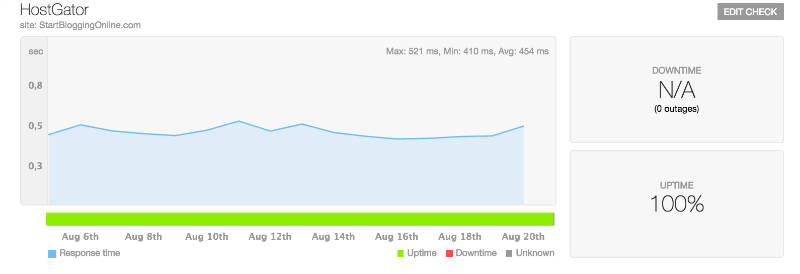
HOSTGATOR has great performance, they are easy to use and it’s probably the best pick for beginners.
However, you can always go with another web hosting as long as it’s fast, reliable and offers unlimited storage & bandwidth. This helps you to avoid problems later on.
Now that we’ve gone through the basics of blogging platforms, it’s time to start walking the walk! With the next step, we’ll get your blog set up and running. If you’re not ready yet because you still need to think of a domain name or can’t set up a blog right away, that’s okay. Click here to sign up so that when you’re ready, you can pick up right where you left off.

Step 2: Set up a Blog on your own domain name (self-hosted WordPress)


If you don’t have a hosting or a domain name yet – don’t worry. I’ll be showing this in a minute…
At the end of this step (2), you will have a fully working self-hosted WordPress blog on your own domain name! Sounds promising, huh?
If for some odd reason you don’t want to use HostGator, you can always choose another hosting provider. I can’t promise they’ll be that good, but the registration and the set up process should be some what similar. Some hosting companies do not have one click install for WordPress. If that’s the case, see this guide for installing WordPress manually (not recommended for beginners, though).

1. Go to www.HostGator.com and then click “Start Your WordPress Blog”.

Remember: Since I’m using HostGator by myself too, I’ve negotiated a discount for people who use this guide (72% off). This discount should be applied automatically. Enjoy
Hostgator landing page

2. Pick a Domain name for your blog

Already have a domain name?
Just write it in the right box (I already own this domain) and keep moving to the next step by scrolling down a bit.
How do I choose a good domain name?
Choosing a bad domain name is one of the most common mistakes I see bloggers make. Be sure you choose a domain name that is…
1. Easy to Remember – Don’t choose a nonsense name, something tough to spell, or a long name full of dashes. “www.best-tech-gadgets-in-the-world.com” won’t ever stick in someone’s head, but something like “www.techgeeks.com” rolls off the tongue.
2. Unique and Descriptive – You want a name that reflects who you are and what you care about. Be creative and build an identity you’re excited about!
3. Trustworthy – Domain extensions like “.com”, “.org” or “.net” are the most popular, with “.com” being the one most people think of first. Try to avoid crazy extensions like “.rocks” or “.biz”, as these are less commonly used, tougher to remember and not as trusted.
Type the domain name you want to use in the box, then click “next”. If the name is available, you’ll be able to claim it. If it’s not available, choose another one.
Your_Blog_Domain
If the name you want isn’t available, HostGator will show you some alternatives that are similar – or you can punch in a new name and try again. I’d suggest you to use something that ends with .com, .net or .org

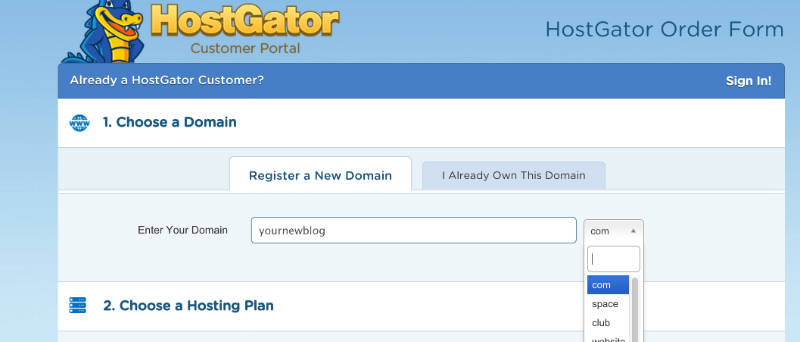
3. Choose your blog hosting plan

I recommend the “Hatchling” plan for now – you can always upgrade later if you decide you want more advanced features, but you get more than enough with the Hatchling.
choose_blog_hosting_plan

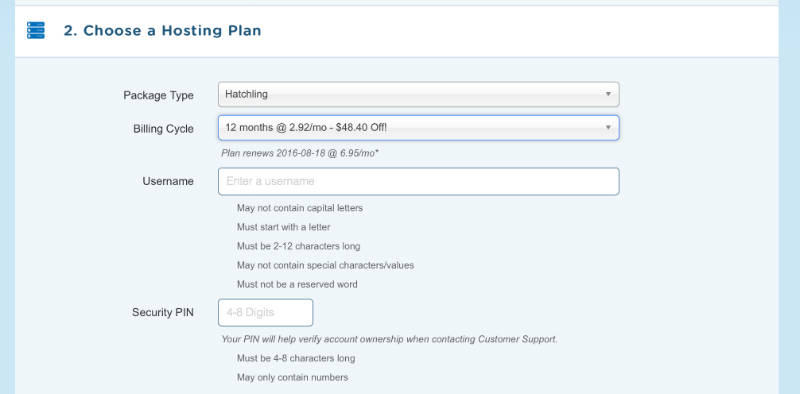
4. Complete your registration

Once you’ve chosen Hatchling plan and found a name you like that’s available, you’ll need to register it by putting in your contact and billing information.
You’ll also have a chance to customize your package a bit. This is a chance to save some more money, so don’t skip it! Apply discount code “STARTBLOG”
extra services for hg signup


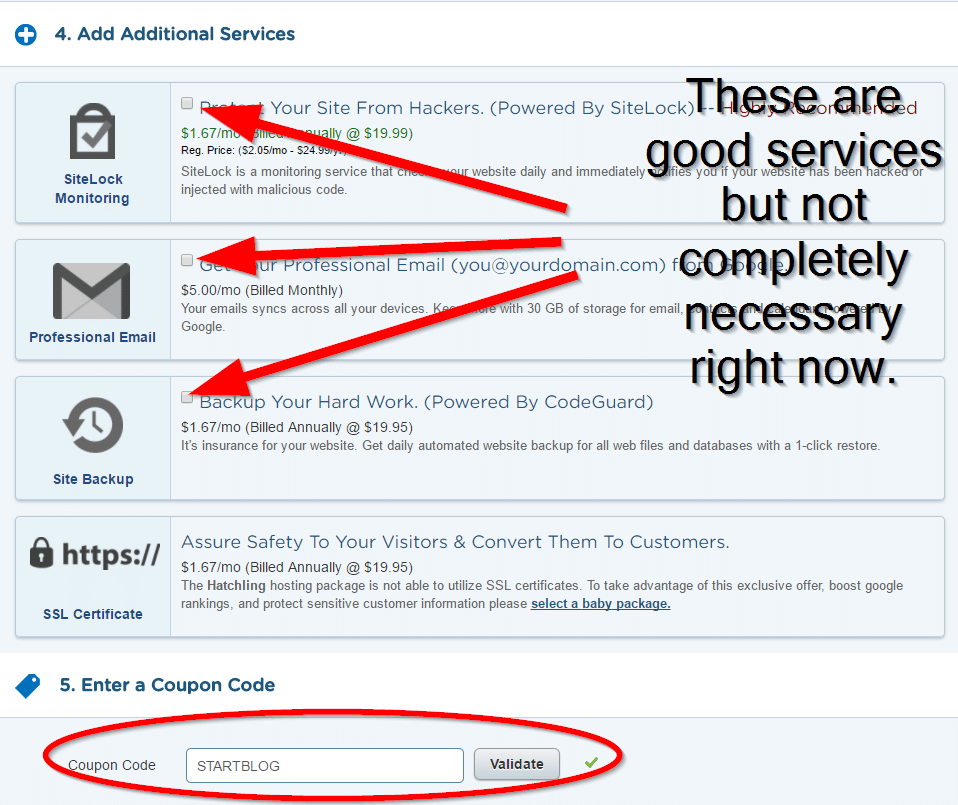
I would take a look at each of these additional services to see if you want any of them.  I don’t believe they are necessary for you at this stage.

5. Log in to your new account and install WordPress blog

It may take a few minutes for HostGator to register your account, so be patient. You should get a confirmation email when your account is ready.

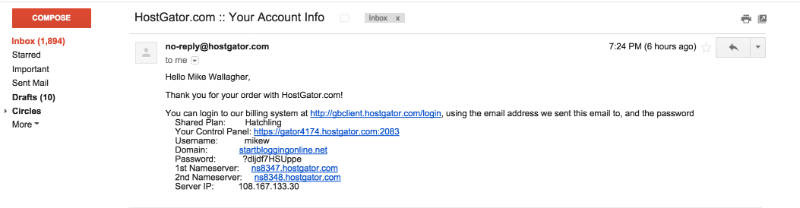
Once you’ve logged in to your control panel (all the information you need for that should be on your inbox) , it’s time to install WordPress. Thankfully, this takes just one click!
  • Log-in to your Hostgator control panel
  • At the top click “Get Started With WordPress Today”
  • If WordPress isn’t there for some reason, scroll down a little bit on the control panel and click on “Quick Install” under the Software & Services section. Look at the top of the page, in the left sidebar section for WordPress.
Once clicked, you’ll be automatically transferred to Mojomarketplace.com – don’t panic, this is just a site that helps HostGator install platforms (like WordPress).
You should immediately see a screen where you’re offered to “Install” or “Import” WordPress.
Click “Install” to get to the next step.
When you’re finished, “Install WordPress”. Once you’ve done that, you’ll see a loading bar at the top of your page that will eventually tell you that your WordPress blog has been installed and you’ll see your log-in credentials.
blog_install_finished

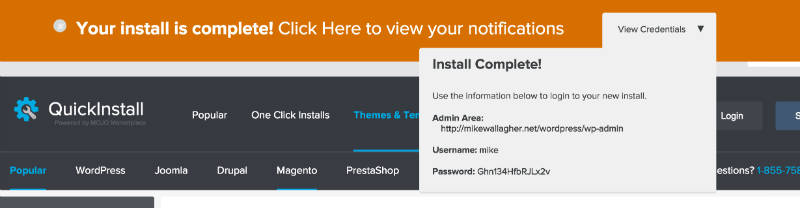
6. Log in in and check out your new blog

Once the installation completes, you’ll get an email that shares your login information, including an “Admin URL”. (In case you missed that notification bar)
To log in to your blog, click the admin URL. If you forget this URL, it’s simply www.yourblog.com/wp-admin (where “yourblog” is your domain name).
New Blog Homepage (1-6 steps)
Congratulations – you now know how to make a blog using WordPress. You’ve installed WordPress and set up your blog, all on your own! As you can see, it was really easy and straightforward.


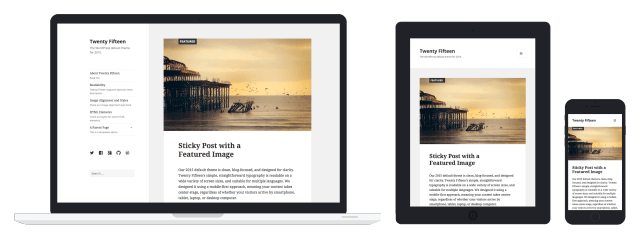
Step 3: Designing your blog


In this section, I’ll show you some WordPress blog basics, including:
WordPress blog
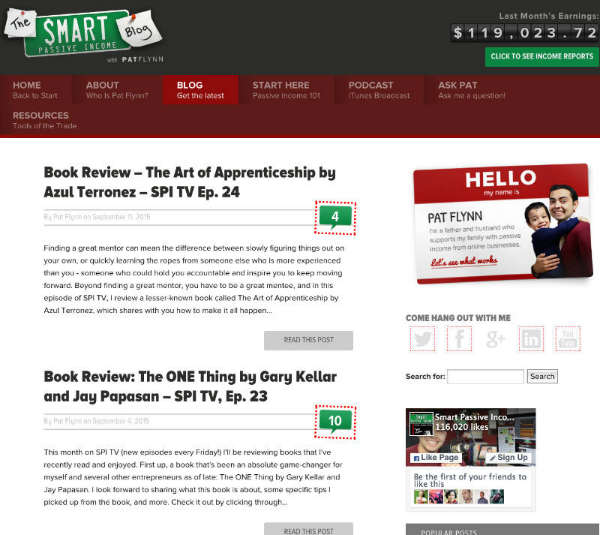
Sample of a customized WordPress blog (SmartPassiveIncome.com)
  • Changing your blog’s design
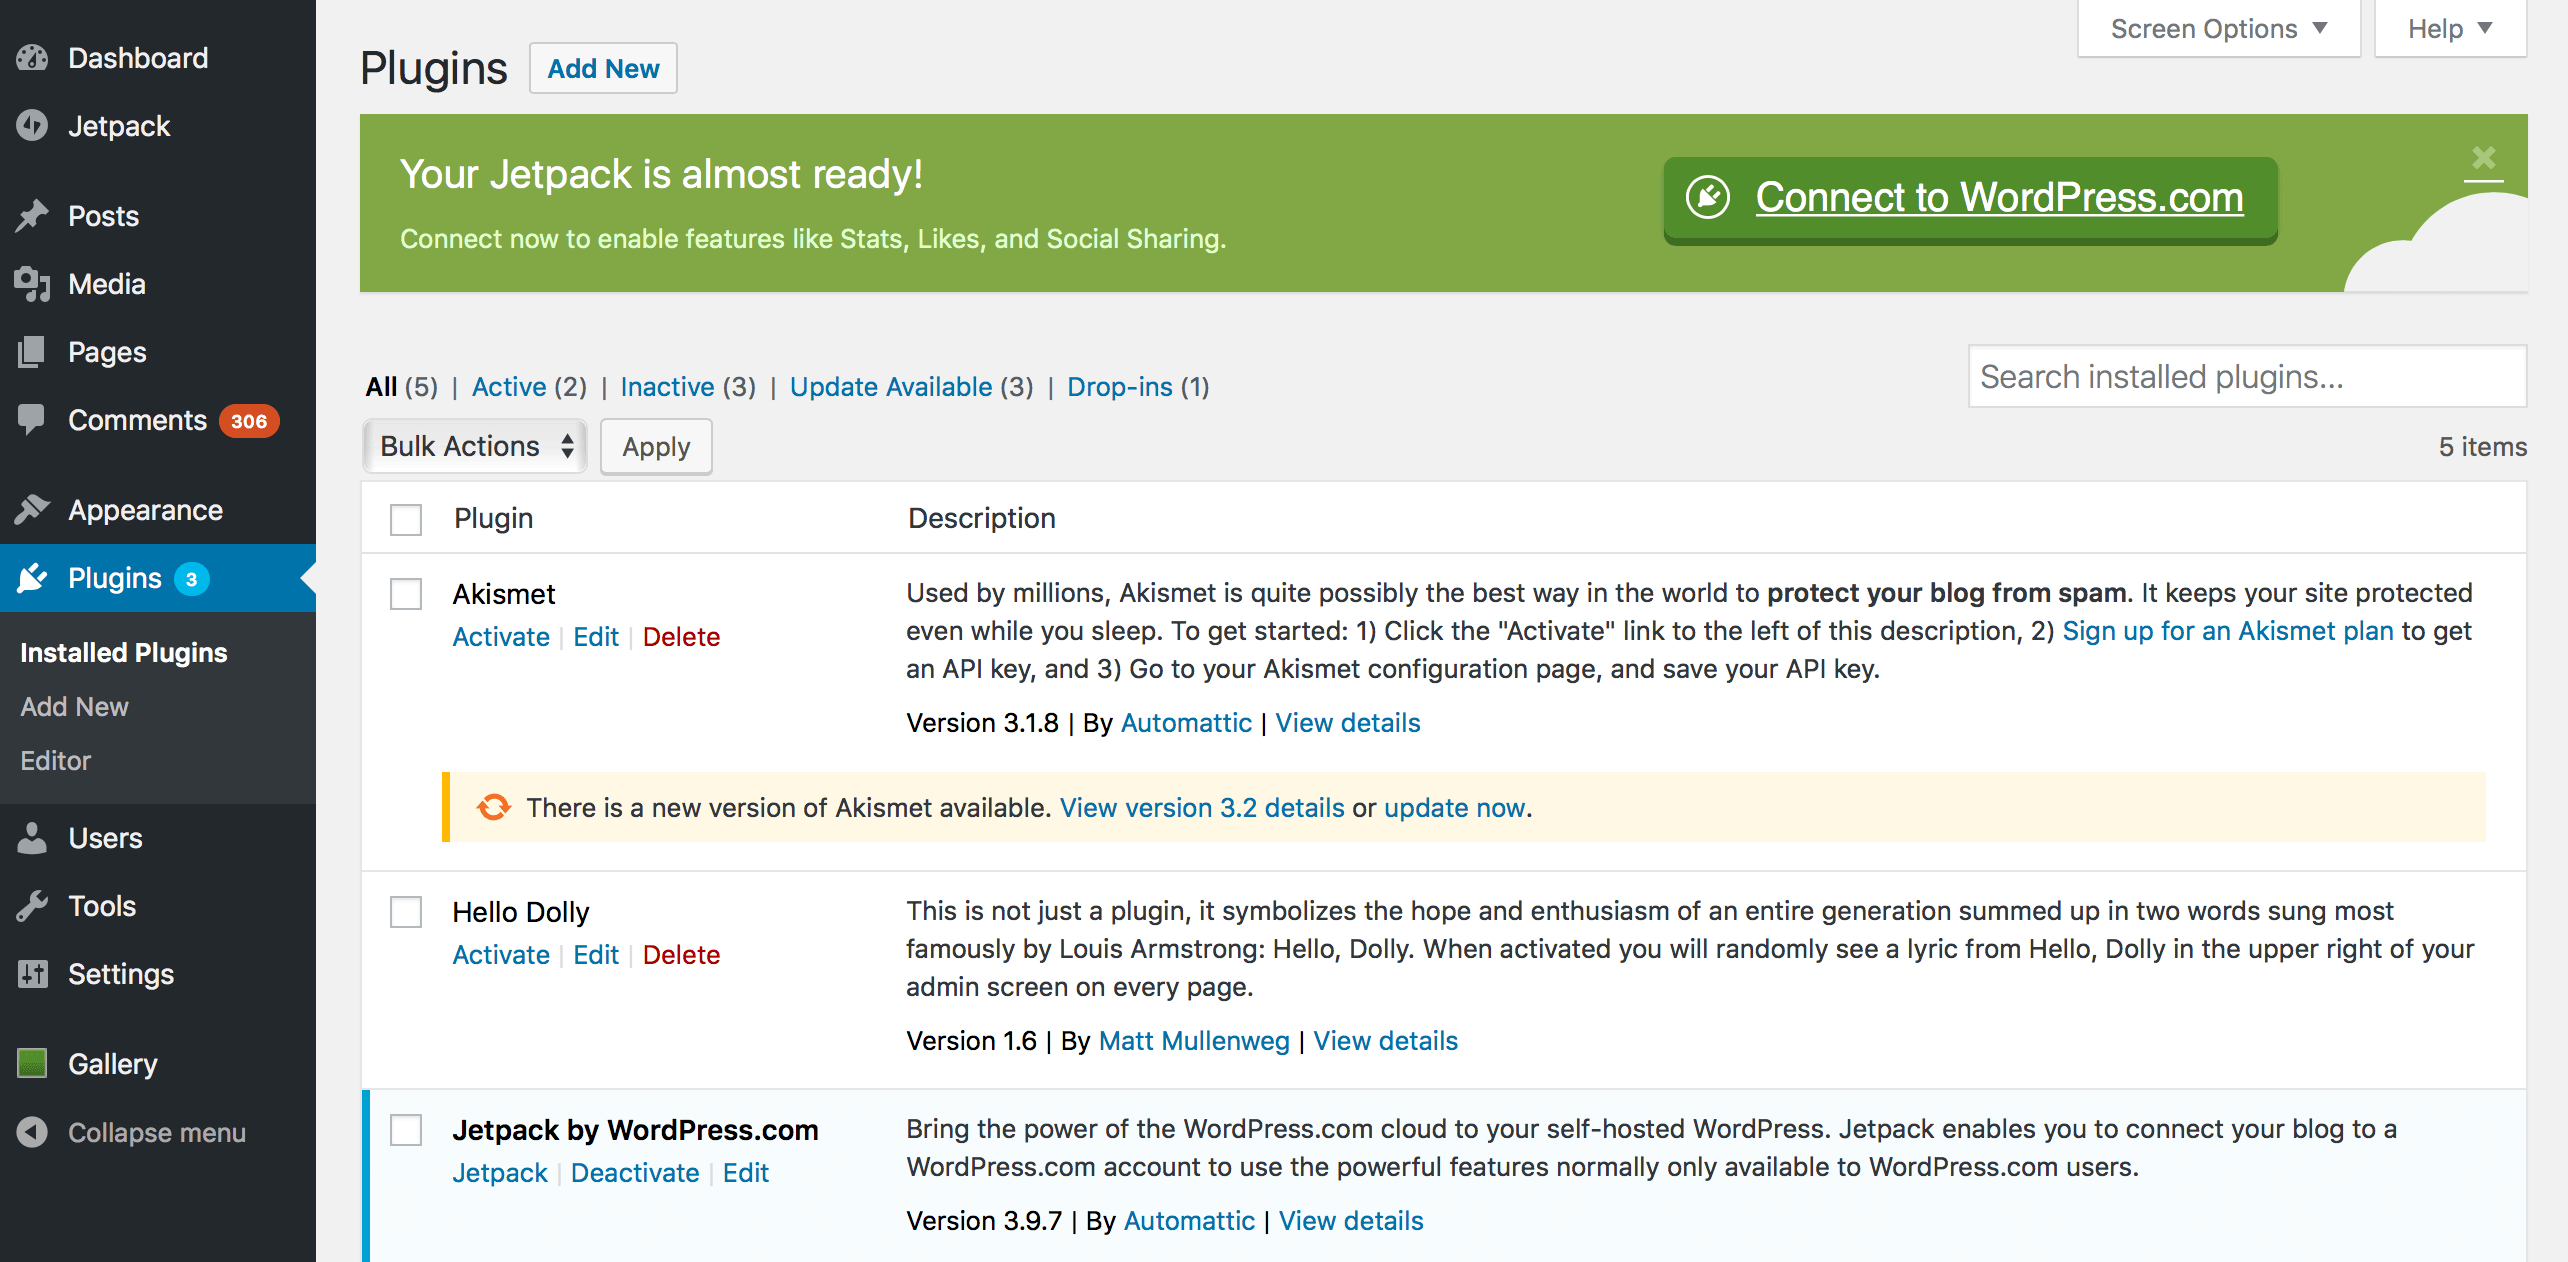
  • Installing new plugins/features
  • Making your blog search engine friendly
If you’ve set up your blog, you’re now ready to start using WordPress and customizing your blog. I promise – it’ll be pretty easy and fun at the same time.
Remember: You can log in to your blog by going to www.yourblog.com/wp-admin/ and using the credentials you set up with HostGator or any other hosting company you used.

Changing Your Blog’s Design (Themes & Layouts)

WordPress blogging platform uses design templates called “Themes” to figure out how your site should look. Changing your blog’s layout and design is as simple as installing a new theme.
There are over 2,000 professionally designed, fully-c
ustomizable and free themes to choose from – so you’ve got a lot of options. If you want to see premium themes and designs like the Genesis Framework, head over to Themeforest.net

Here’s how to find and install a theme you love:

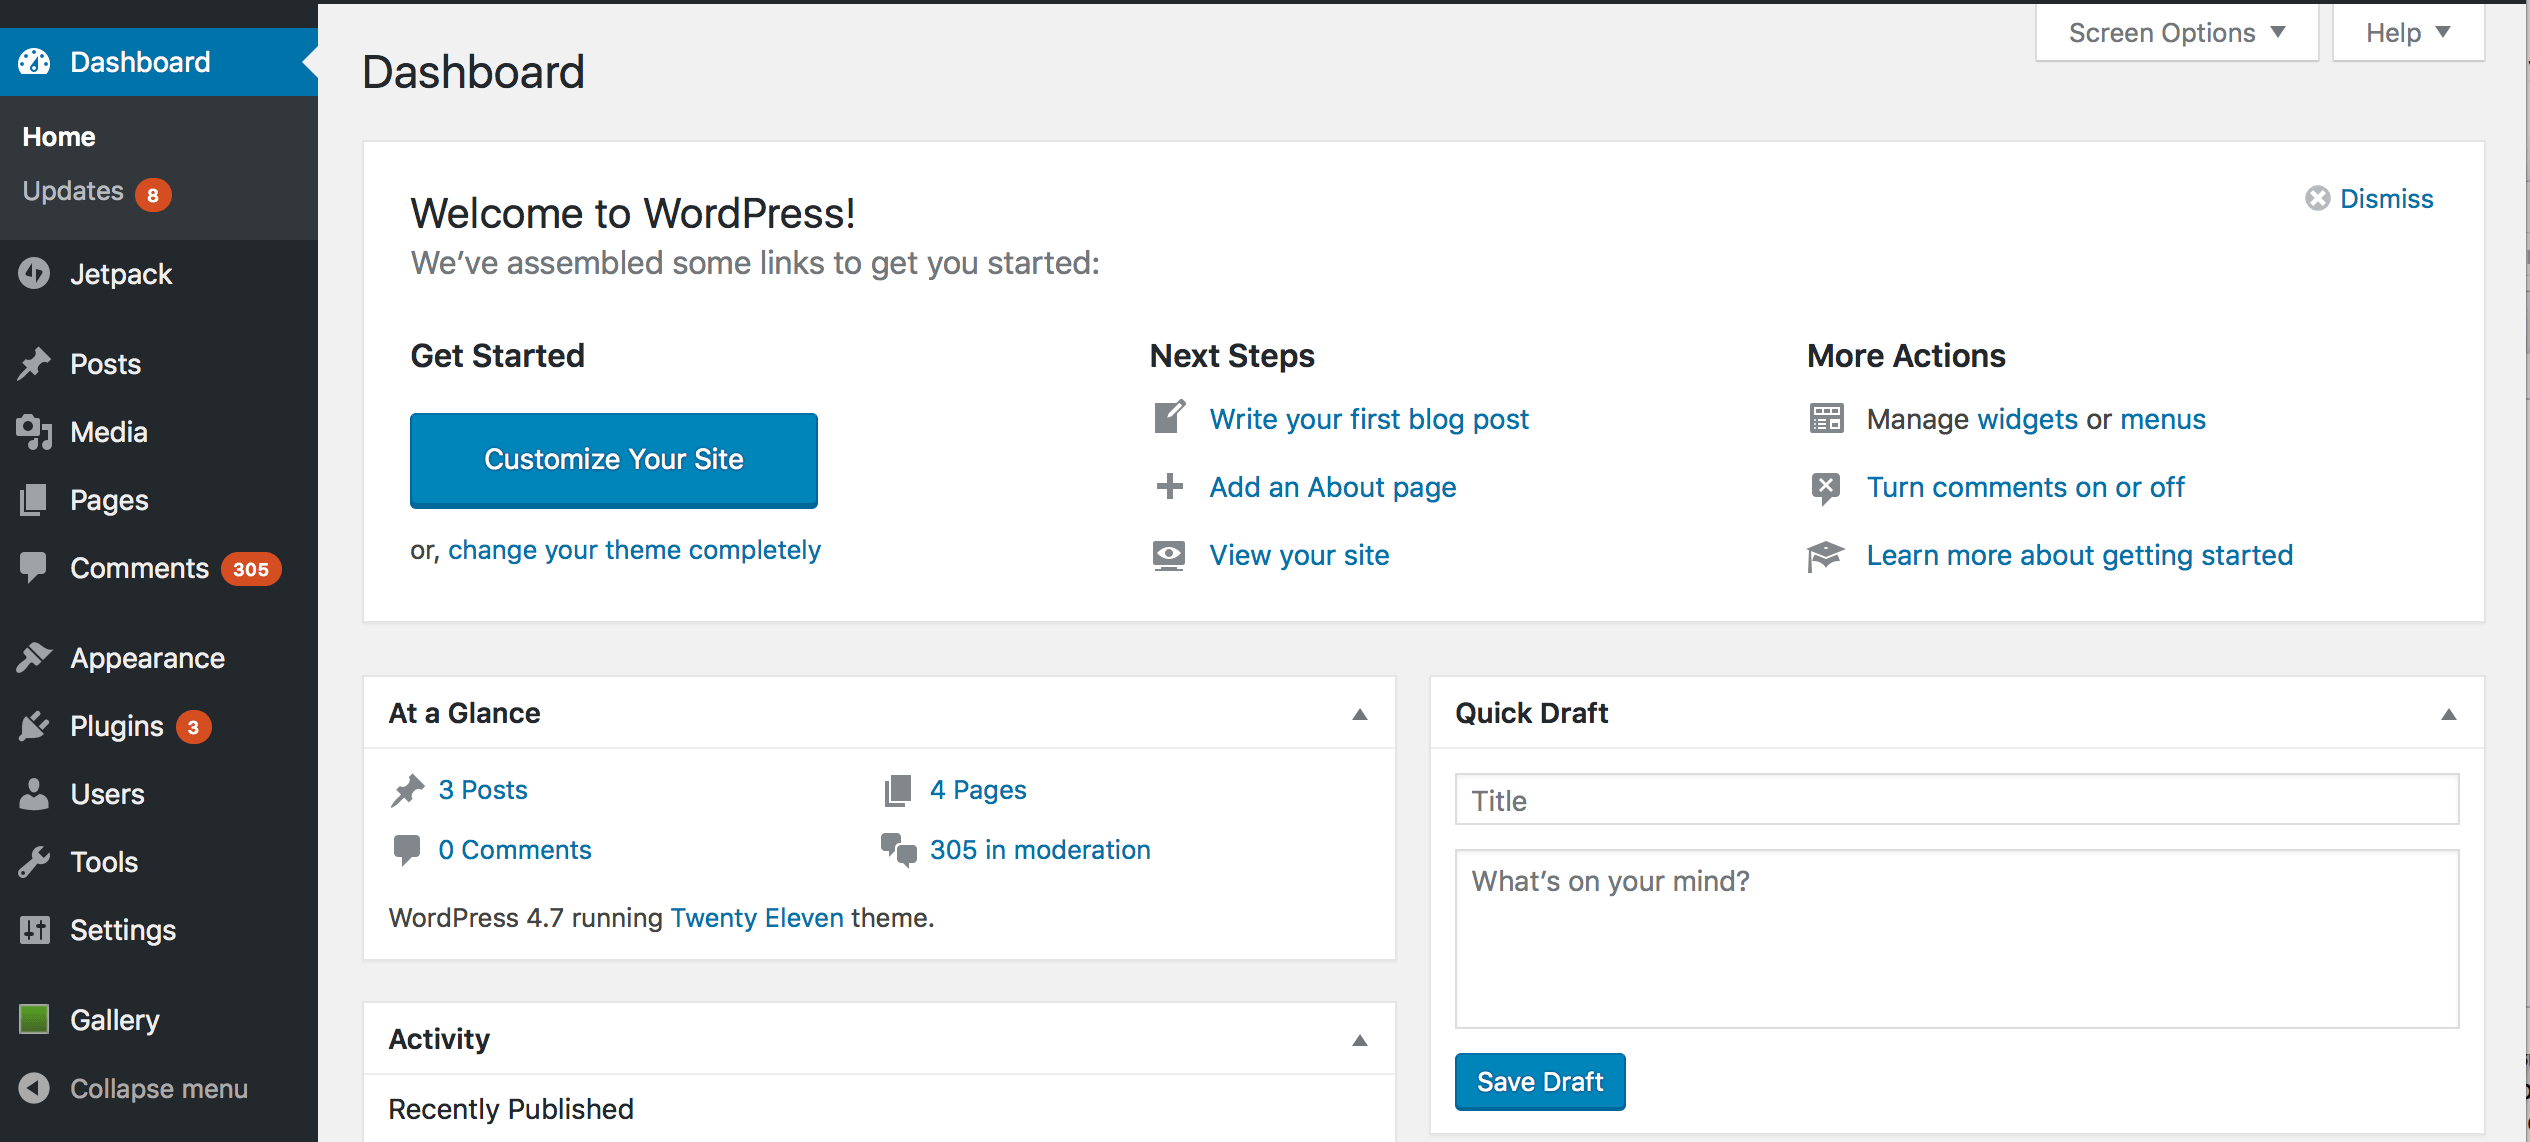
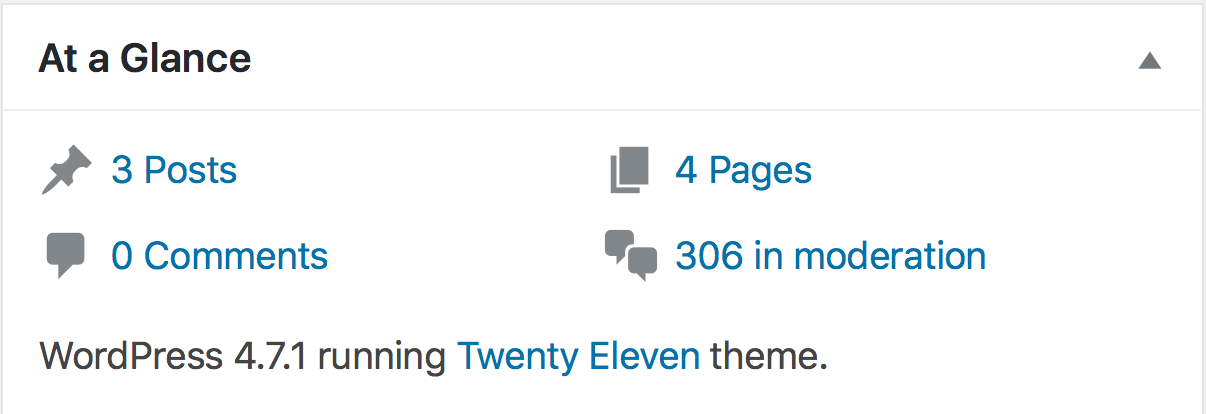
When you log in for the first time, you’ll see a dashboard or admin panel that looks something like this:
Your_WordPress_dashboard

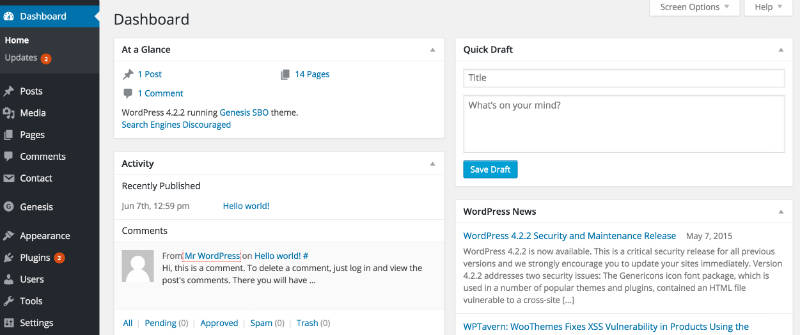
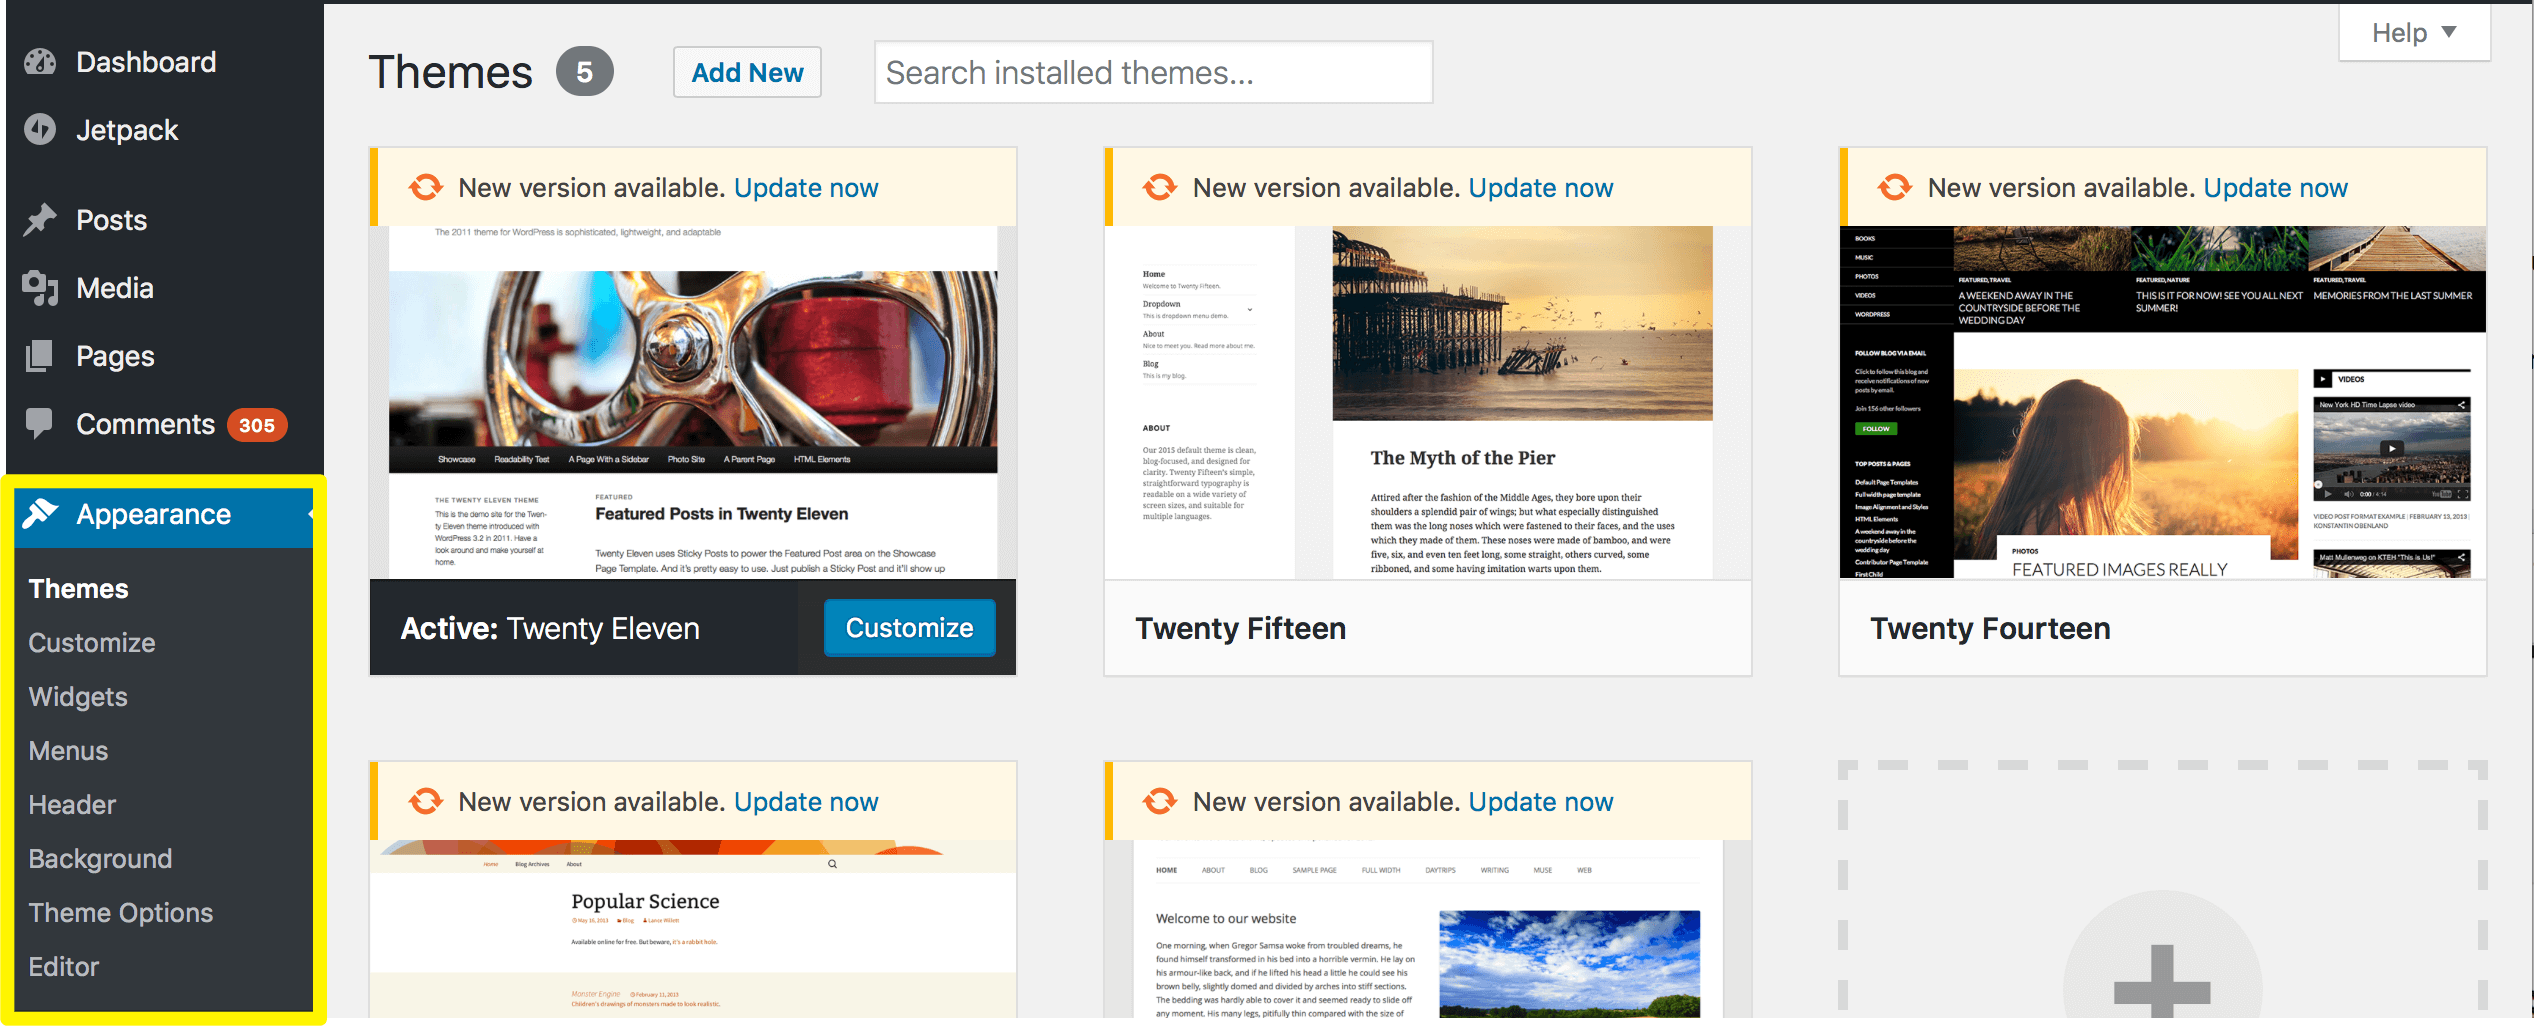
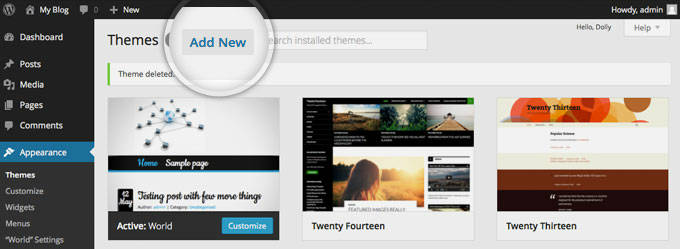
Mouse-over the “Appearance” tab in the WordPress sidebar, then click on “Themes”.
find_a_perfect_theme

On the next screen, you’ll see several themes are already installed. If you don’t like those, click the “Add New” button at the top, or the great big “Add New” square to start searching for a theme.
add_new_theme
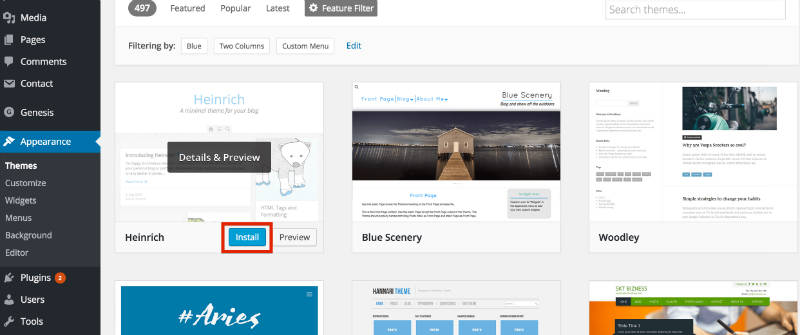
Now, you’ll see tabs where you’ll find featured, popular and brand new themes, as well as a “Feature Filter” and search bar.
featured_themes

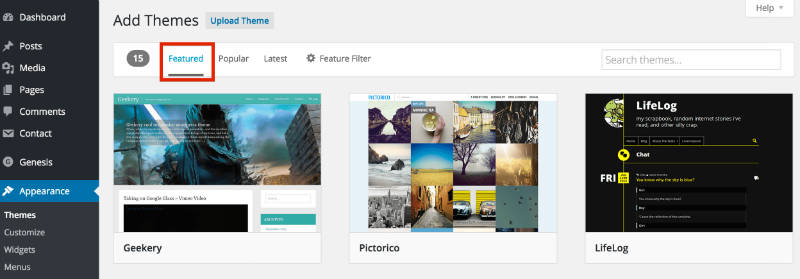
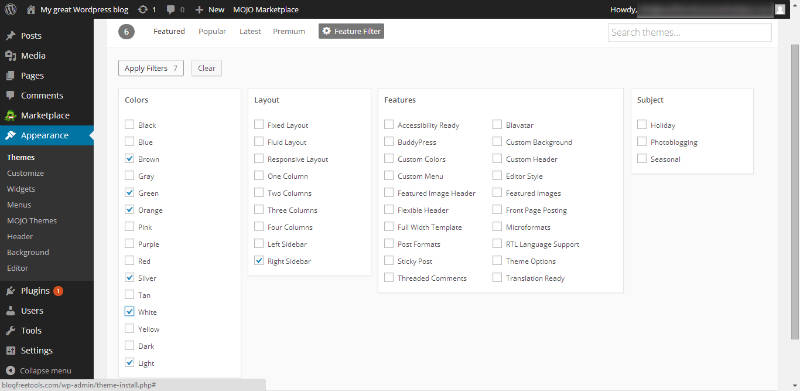
I really like the “Feature Filter” option, because you can choose themes in certain color schemes, select specific layouts and even choose themes with built-in advanced features.
Just choose the options you want, then click “Apply Filters” on the left hand side. If you’re finding this challenging, just search by keyword – there’s no wrong way!
apply_filters

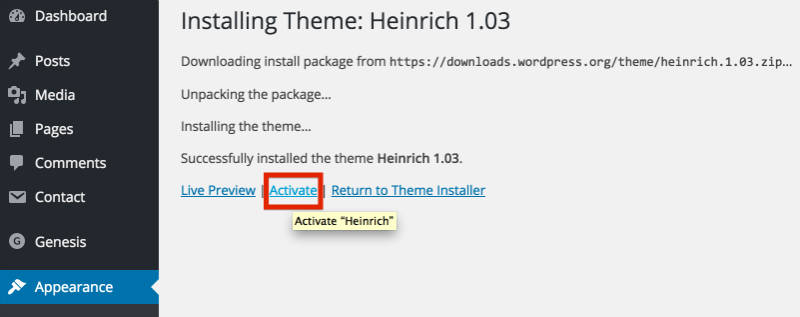
When you’ve found a theme you like, click “Install”. You’re nearly done!
Once the theme has been installed, all that’s left to do is click “Activate” on the next screen:
activate_your_blog_theme

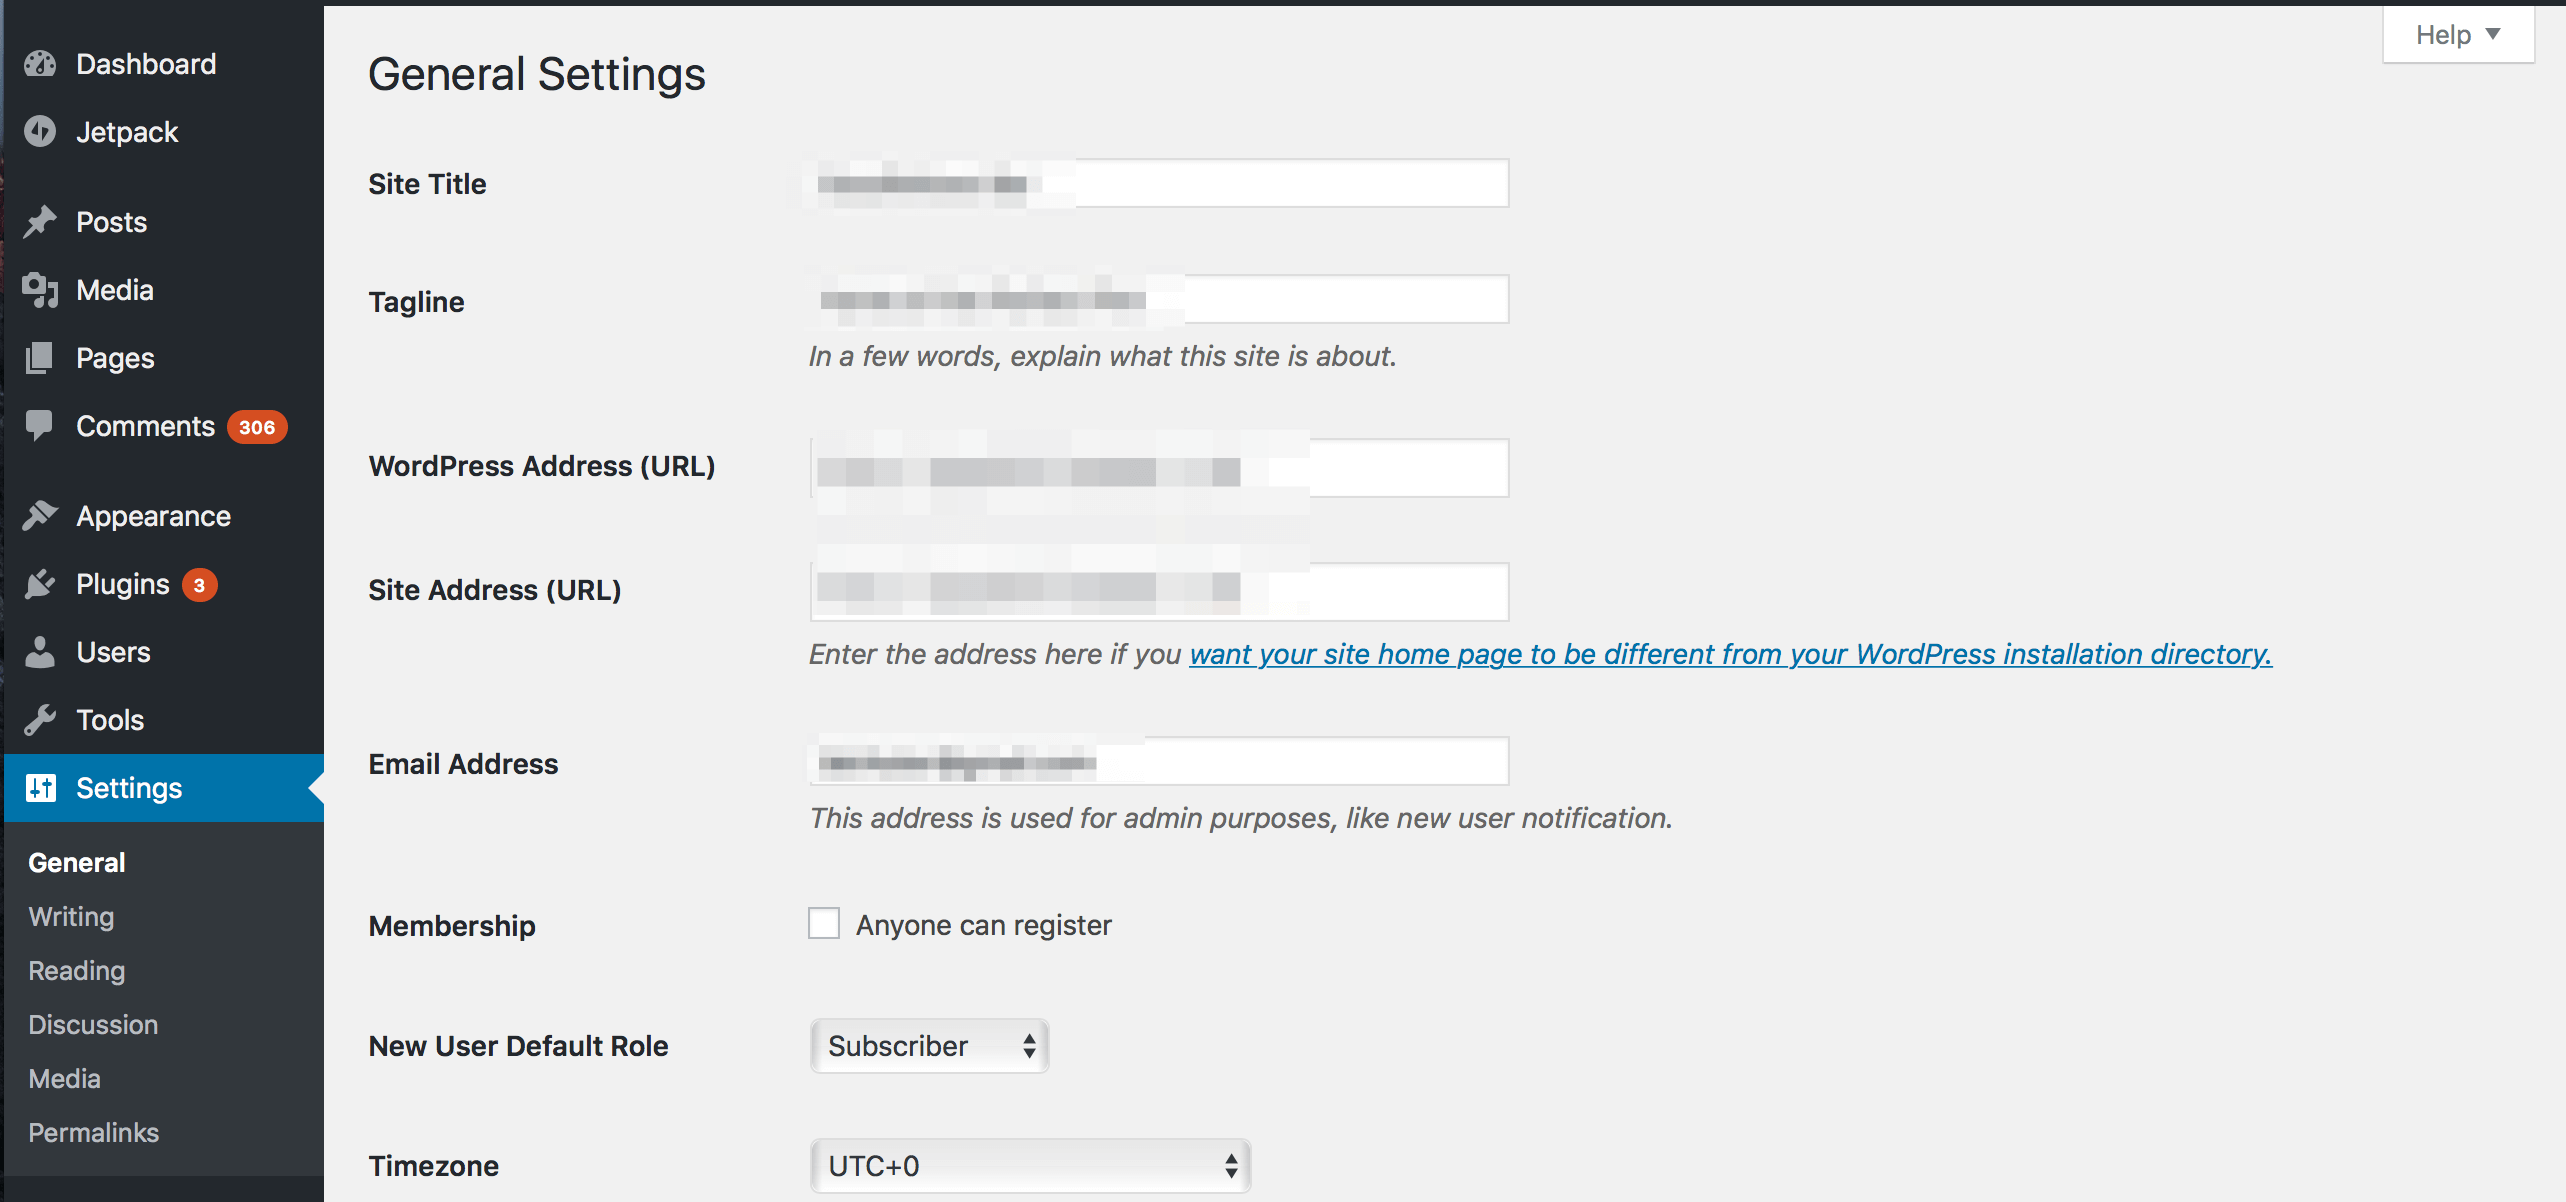
Configuring your blog to be search engine friendly

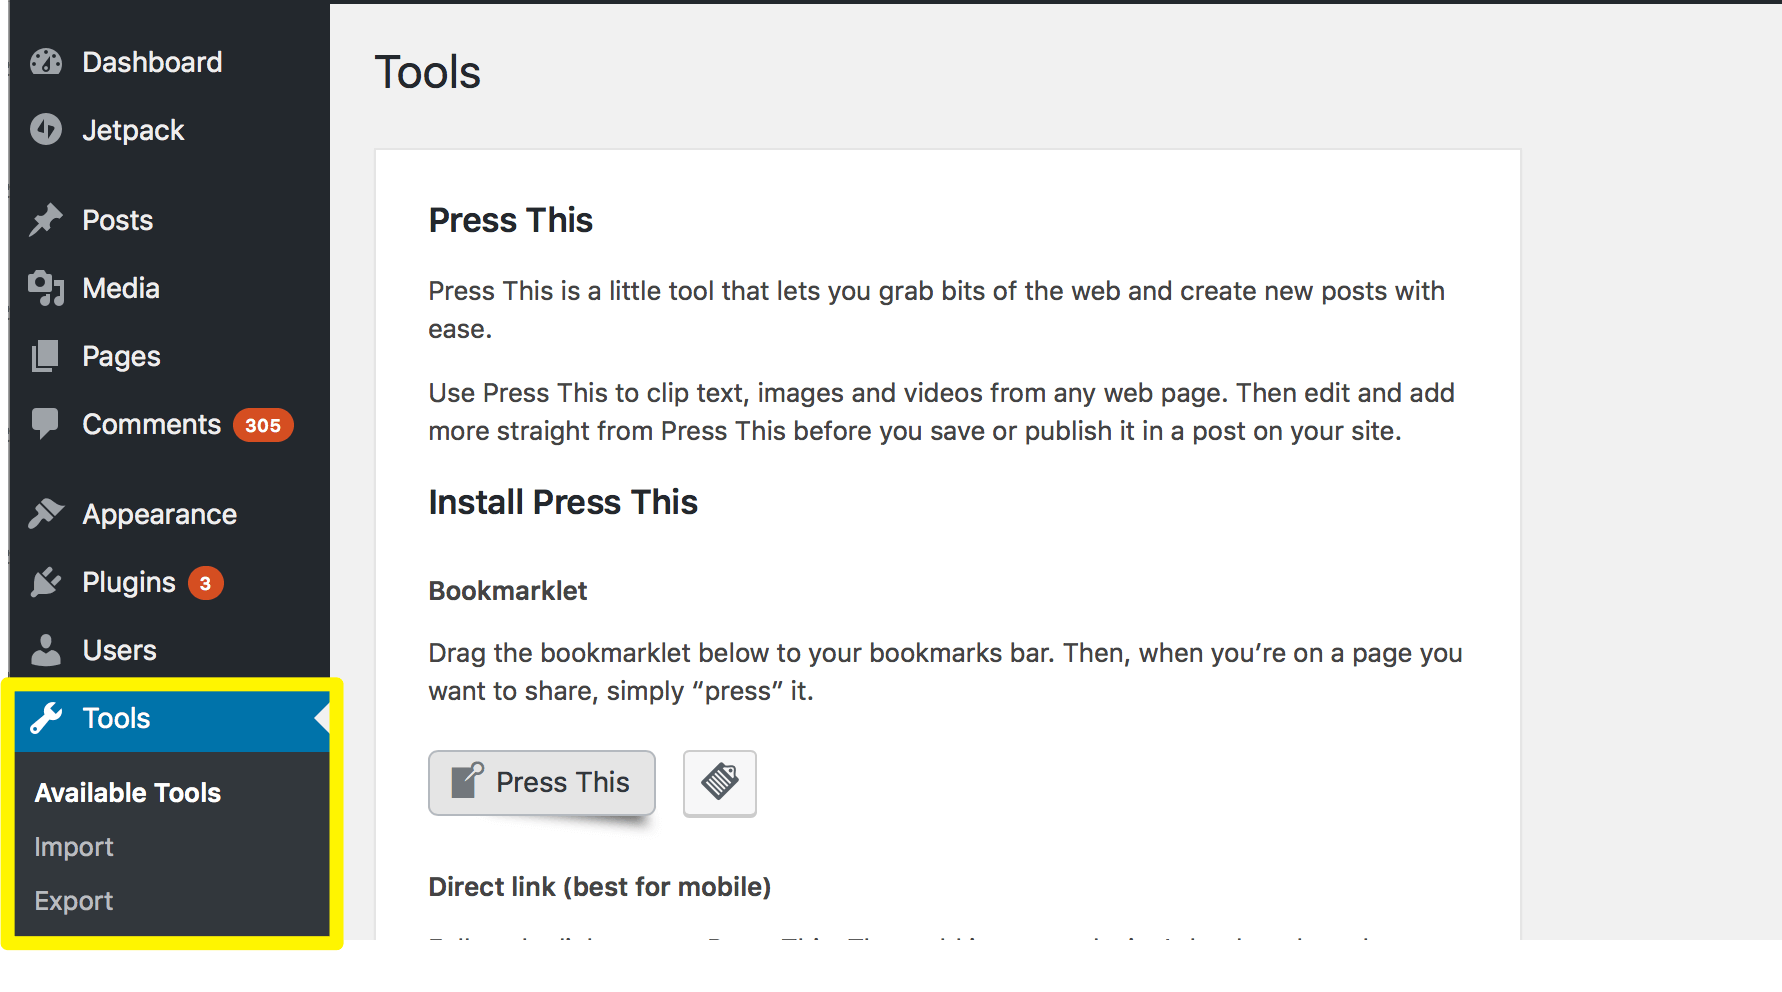
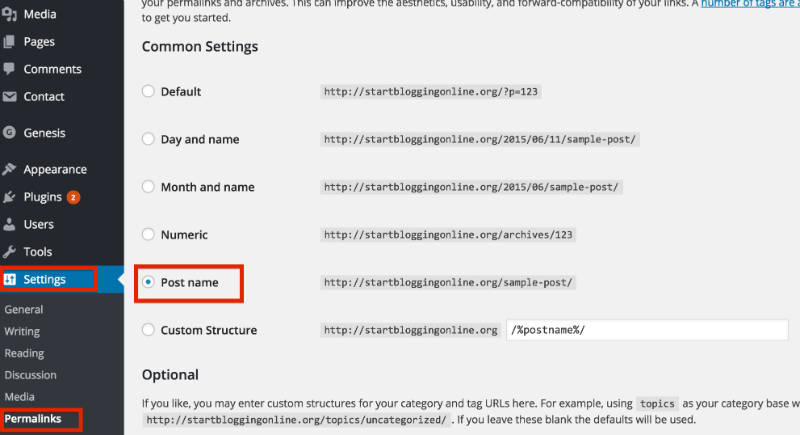
There are some things you’d need to do to make your blog more search engine friendly. Search engines do not like two things:
  1. Ugly and clumsy URL-shttp://yourblog.com/2012/04/topic-a/author-Karen/how-to-start-a-blog. A much better way is to use: http://yourblog.com/start-a-blog
See the difference? One is filled with irrelevant information and the another one is short, clean and neat.
In order to change your links to a more cleaner, click on the “Settings” -> “Permalinks” and use the following settings:
permalinks

2. Spam comments – Unfortunately, lots of people want to leave automate spam comments on your blog. They do that for couple of reasons – to get people from your blog to their blog and to advertise their services/products.
To avoid that, make sure you moderate your comments. Here’s how to do that: Go to “Settings” -> “Discussion” and tick those two options.
disable_comments


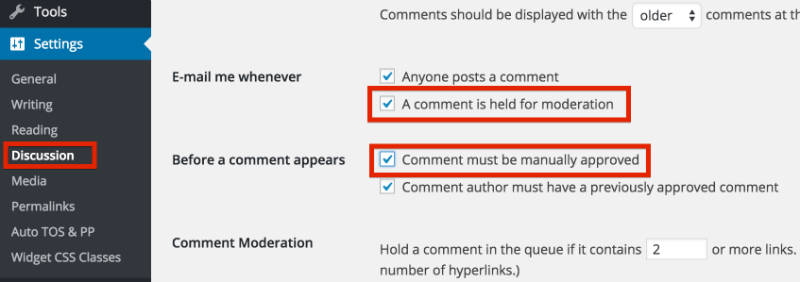
Step 4: Adding/Writing Blog Posts and Pages


By now you should have fully working WordPress blog on your own domain name. You should also have a custom blog theme that fits with your blog’s topic. Congratulations – you’ve done a LOT and I’m proud that you’ve managed to get so far.
In the LAST step, I’ll show you how to write your first blog post and share some tips for writing blog posts.
In this section, I’ll show you…
  • How to write a post inside WordPress
  • How to add images, links and format text
  • Some quick tips and tricks for writing great content

Using WordPress to Blog

Adding a New Post

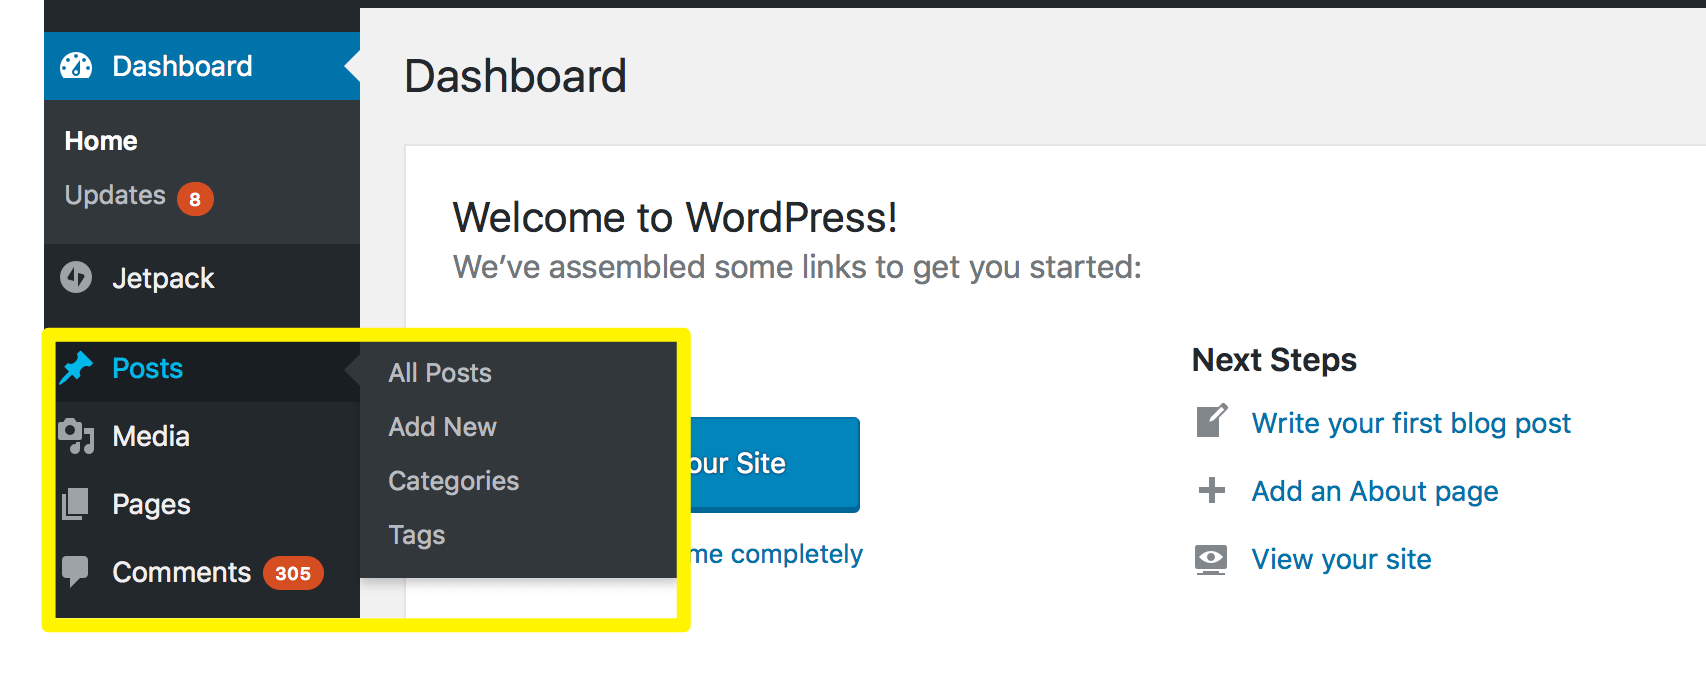
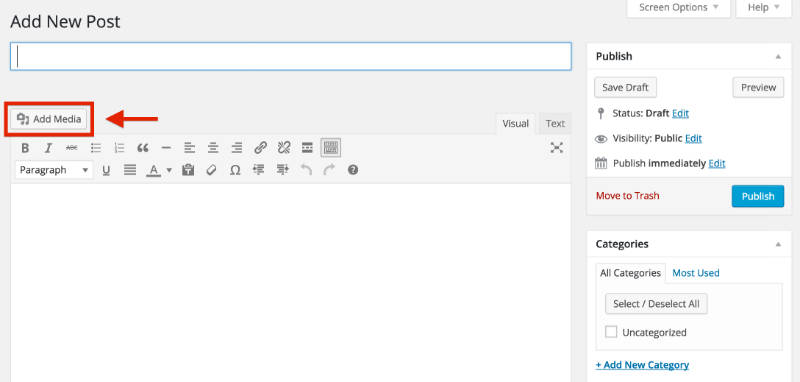
To add a new blog post, click the “Posts” section on the left hand side-menu, then click on “Add New”.
Adding_a_new_blog_post
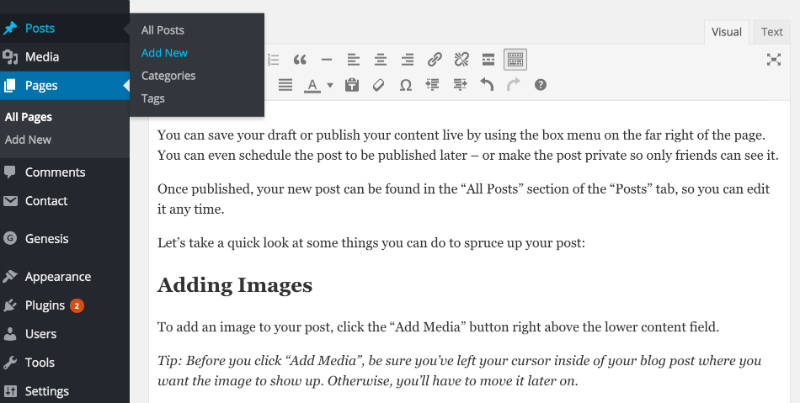
On the next screen, you’ll see something like this:
Writing new blog post
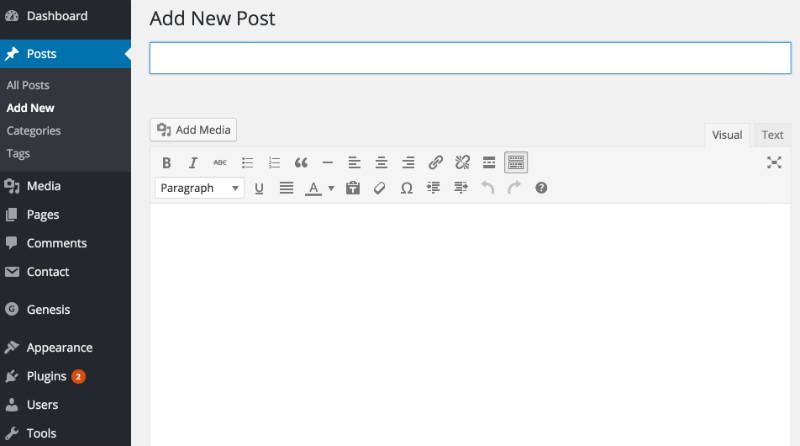
You can add the title to your blog post in the top field, and your content goes in the big text box below the title.
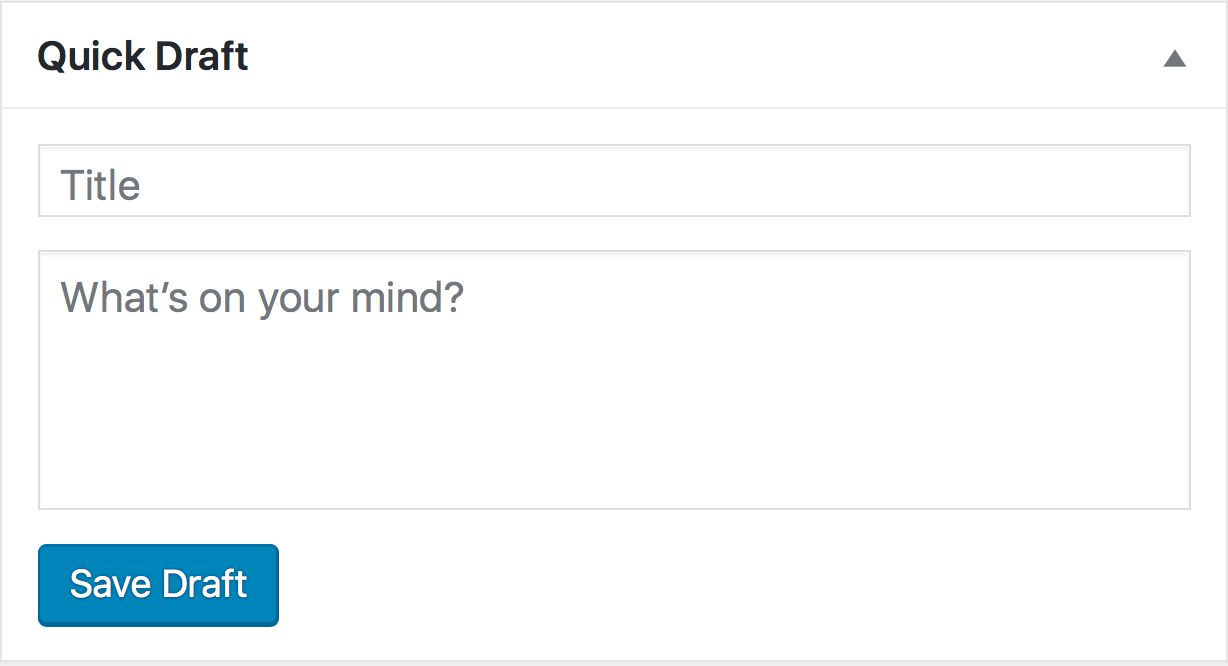
You can save your draft or publish your content live by using the box menu on the far right of the page. You can even schedule the post to be published later – or make the post private so only friends can see it.
BlogPost_status_visibility
Once published, your new post can be found in the “All Posts” section of the “Posts” tab, so you can edit it any time.
Let’s take a quick look at some things you can do to spruce up your post:

Adding Images

To add an image to your post, click the “Add Media” button right above the lower content field.
Tip: Before you click “Add Media”, be sure you’ve left your cursor inside of your blog post where you want the image to show up. Otherwise, you’ll have to move it later on.
Adding_media

Next, click the “Upload Files” tab on the screen that pops up, then click “Select Files”.
adding_images_blog_post
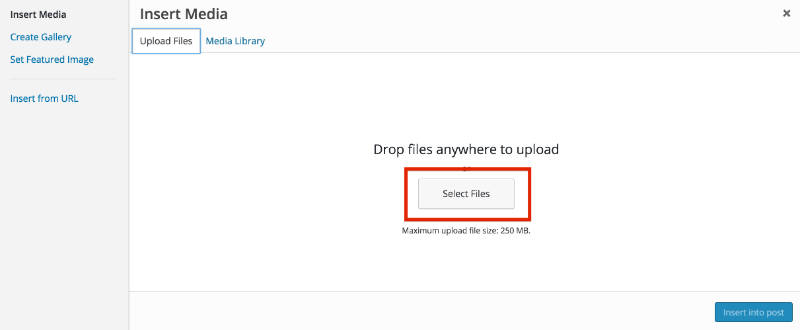
Once you’ve found the file, double click it and WordPress will upload it automatically.
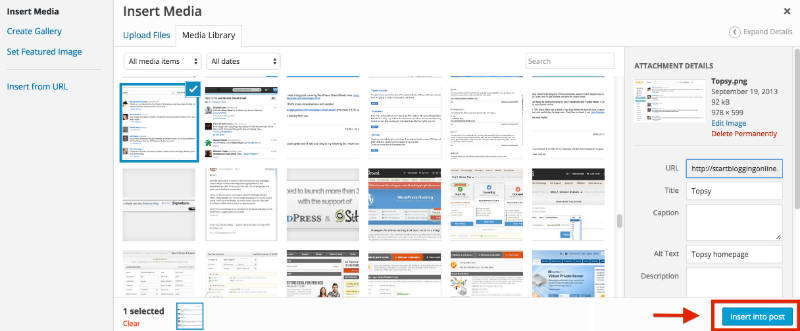
When the upload is finished, make sure the image you want is selected, then click the “Insert into post” button to add the image to the post you’re writing.
insert_image_into_blogpost

Adding a Link

Linking out to other websites is a great way to build relationships and share interesting content.
To add a link, click on the icon in the toolbar that looks a bit like a chain link.
instert_a_blog_link
On the pop-up, you’ll need to enter a few important bits of information.
Adding_link2
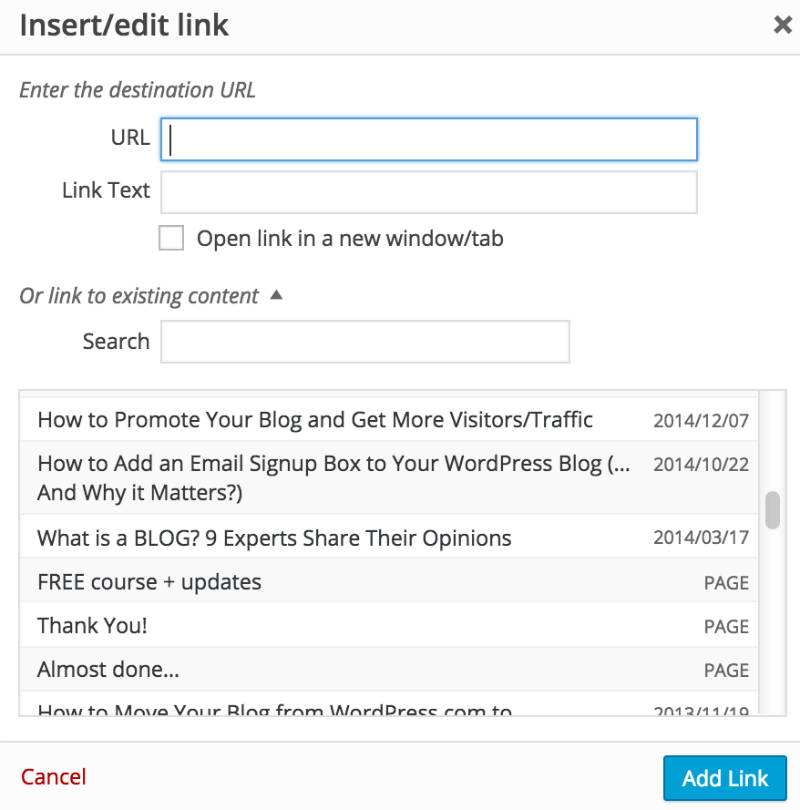
  • URL is the web address of the link you want to share. Make sure you include “http://” before the “www.” address, or your link will be broken.
  • “Link Text” is the text you want people to click on to get to your link. It might be “Click here”, or anything you choose.
  • “Open link in a new window/tab” – it’s a smart idea to check this box. Otherwise, when someone clicks your link, they’ll leave your blog.
  • If you want to link to an existing page, you can use the “Search” section to find a post or page you’ve already created and click it to add a link.
Finally, click “Add Link”, and your link will be added where you left your cursor in the post you were writing.

Adding Headers & Editing Text

It’s a good idea to use headers and bolding to make your content easier to read and scan.

Adding Headings

To add a heading, click on the drop-down menu on the bottom left of the toolbar.
Blog_Post_Headings
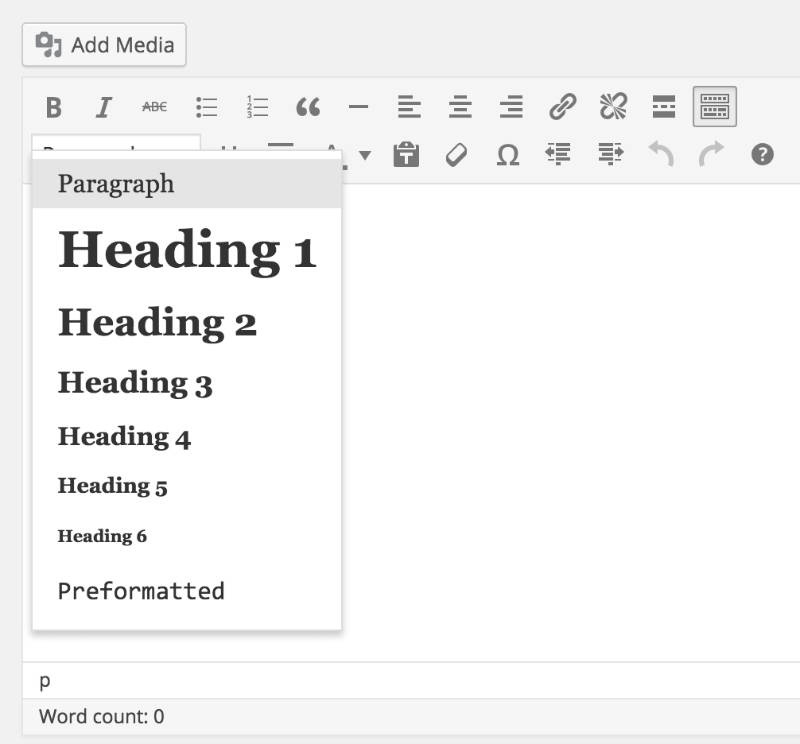
Try to only use “Heading 1” once within your page (usually at the top), and use “Heading 2” or “Heading 3” for other sections in the copy, as this is better for search engines.
Tip: You can also highlight the text you want to change in your blog post, THEN click on the dropdown menu and select the format you want the text to be in.

Editing Fonts

You can also bold, italicize, underline and even change the colour of your text in a click or two.
change_font
  • “B” is for bolding
  • “I” is for italics
  • U” is to underline your text
  • A” will open a dropdown menu where you can select font color
As you can see, this is all pretty simple for someone who has worked with Microsoft Word.

Step 5: Start Growing Your Blog


Analytics from StartBloggingOnline.com (taken from my personal laptop).
Now that you have set up your blog and know the basics, it’s time to make your blog successful. Many
beginners struggle at that point, thus I’ve put together a handful of guides to get you going easier.
If I were you, I’d suggest you to go and check my resource page here. It contains all the content that I’ve published on StartBloggingOnline.com over the past couple of years. It’s nothing too much, but enough to get you going and a bit more.

Things to do after you’ve created your blog:

The first thing I’d do is create a proper About Me and Contact page.
  • Creating a perfect about me page (This is usually the most visited page on your blog)
  • Adding a Contact Page/Form on your blog (So that your readers could contact you)


Wednesday, June 21, 2017

A BIGGINERS GUIDE TO THE WORDPRESS DASHBOARD


WordPress is a fantastic tool for content publication and management, but the platform can be intimidating for new users. If you’re using the Content Management System (CMS) for the first time, you may be taken aback by the sheer volume of options available within the WordPress dashboard.
While the dashboard may appear complex at first, things get less intimidating once you get to know its main components. Additionally, studying each widget area and sidebar tab individually will get you a long way towards understanding the platform.

In this guide, we’re going to deconstruct each section of the WordPress dashboard and arm you with the knowledge necessary to master the CMS. Let’s take it from the top!

What is the WordPress Dashboard?

Simply put, the WordPress dashboard is where all the magic happens. Think about it as the command center for your website. It enables you to write new posts, add pages, and customize the look and feel of your site, among several other functions. We’re going to take you through them all, step by step.
Before we dive in, please note this tutorial and all screenshots within were taken from WordPress version 4.7, released on December 6, 2016.  If you’re reading this somewhere down the line, some sections might have changed in the meantime.

What Do I Need to Know About the Main Dashboard Area?

A view of both main areas of the WordPress Dashboard
Upon logging into WordPress, you’ll find that your dashboard is full of widgets, boxes, menus, and tabs. These elements are divided into two distinct “zones” – the main dashboard area in the center of the screen, and the sidebar to the left. Let’s go over the main area first.
This area takes up the most real estate by far, and it’s made up of several widgets offering different features. The first is the Welcome widget.

The Welcome Widget

An up-close glance at the Welcome Widget.
The Welcome widget is located at the top of the main dashboard area. It invites you to jump right into blogging, with direct links to create your first blog post, add an About page, or preview your site. This section also includes links to a WordPress tutorial for newcomers, toggling comments on or off, and customizing your widgets and menus.

The Quick Draft Widget

An up-close look at the Quick Draft Widget
The Quick Draft widget delivers exactly what its name implies – it enables you to get a new post started right away. It can be useful if you’re ever in need of firing off a quick update, but it lacks all the advanced functionality of the WordPress editor, so we wouldn’t recommend using it for a full-fledged post.

The At a Glance Widget

Close-up of the WordPress Dashboard At a Glance Widget.
If you want a bite-sized summary of your most relevant blog stats, the At a Glance widget is the perfect solution. This section displays the number of posts you’ve published, how many pages your site has, the number of overall comments, and how many are waiting for your approval.

The WordPress News Widget

An example of how the WordPress news widget is presented.
True to its name, the WordPress News widget rounds up links to the latest developments for the CMS. It’s the perfect way to stay on top of the most recent events concerning the platform.

The Activity Widget

Activity Widget
The Activity widget displays the most recent activity from you, all members of your staff, and any visitors. By default, the Activity widget will show your website’s most recent posts and any new comments within.

Custom Dashboard Widgets

WordPress doesn’t limit you to only its default widgets on your dashboard – if you have some experience with web development, you can customize it as you see fit. Some plugins will also add their own widgets to the dashboard after activation (if you aren’t familiar with WordPress plugins, we’ll cover them in a minute).

What Do I Need to Know About the Sidebar?

Now that we’ve covered the main dashboard screen, let’s talk about the navigation sidebar, which runs vertically down the left side of your screen. The sidebar is home to the bulk of your WordPress website’s functionality, with individual tabs for each major feature. Let’s go through them one by one.

The Posts, Media, Pages, and Comments Tabs

A glance at the 'Posts' tab and its options.
The Posts, Media, Pages, and Comments tabs cover some of WordPress’ most critical features, and you can find all of them at the top of the sidebar. Each of these tabs is fairly self-explanatory. For example, you can click Post to see a listing of all your existing pieces and add new ones – same for Pages.
What’s the difference between a post and a page, you ask? Simple. Posts are meant to come and go, disappearing off your site’s homepage as they grow older and are replaced with fresh content. Conversely, pages are permanent features of your website. For example, this piece was created using WordPress’ Posts tab, whereas the Themes link at the top of your screen will take you to a permanent page. (The above isn’t a complete definition, but certainly good enough to be getting started with.)
Finally, we arrive at the Comments and Media tabs. The Comments section enables you to oversee and moderate user comments, while the media tab leads to a library of all your content, including photos, video, and audio.

The Appearance Tab

A look at the 'Themes' option under 'Appearance.'
The Appearance tab leads to a menu that enables you to manipulate the look of your WordPress site through several features. First of all, you can switch between WordPress themes here, most of which can have an enormous impact on both your site’s style and functionality. The Appearance panel enables the discovery, activation, and customization of both free and premium themes. If you want to learn more about how to add and use themes, check out this excellent tutorial.
Furthermore, the Appearance tab also enables you to edit your website’s main menu, and add new widgets to your pages.

The Plugins Tab

A look at the WordPress plugins panel.
To put it simply, plugins are tools that extend WordPress’ functionality. This tab enables you to add, delete, activate, and deactivate them as you will.
WordPress was designed to be lean and mean out of the box, which is what makes plugins so useful. It’s a modular system that enables you to enhance your site in any way you see fit, from compressing images, to improving Search Engine Optimization (SEO). If you’re not sure where to start looking for plugins, check out WordPress’ official repository.

The Users Tab

A close-up of the WordPress users panel.
This WordPress tab enables you to manage existing users and add new ones. Subscriber, Contributor, Author, Editor, and Administrator user roles are included by default and can be granted to anyone at your discretion.
Bear in mind that any additional administrators (aside from you) will have full access to all the site’s features, so think it over carefully before assigning this role to any user!

The Tools Tab

The 'Tools' section of the WordPress Dashboard.
The WordPress Tools tab offers several management options, such as the ability to mass import posts and comments from another platform. By default, WordPress enables you to import content from the following platforms:
Likewise, you can also export your own WordPress content, should you want to back it up, or move it elsewhere.

The Settings Tab

A glance at the WordPress settings panel.
Think about the Settings tab as your primary site-wide configuration panel. It enables you to change your site’s title, site address, language, date display options, and even your administrator email.
Additionally, the Settings panel enables you to toggle user registration on and off, as well as set a default role for new users. WordPress usually sets new users as Subscribers, which means they can view content, and edit their own profiles, but don’t have any additional permissions.

Conclusion

The extensive range of options available within the WordPress dashboard can be daunting at first. However, learning how to use the platform doesn’t have to be complicated. In fact, the dashboard’s straightforward layout enables you to tackle critical tasks without the need for a lengthy introduction.
In short, all you need to know to get your WordPress career off to a solid start is this:
  1. Learn what the WordPress dashboard is and what its main sections are.
  2. Become familiar with the main dashboard widgets.
  3. Go over the dashboard’s sidebar, which covers the platform’s core functionality.
Do you have any questions about the WordPress dashboard? We’re all ears. Drop us a line in the comments section below!

BLOGSPOT VERSUS WORDPRESS


If you’re planning to start a blog, you can be forgiven for getting confused over which platform you should go with. There are a lot of options, and different services may work for a variety of uses or goals. So today, we’re comparing BlogSpot vs. WordPress to see which blog platform reigns supreme. We’ll walk through the various features of each and explore the pros and cons. We’ll also put to rest any confusion you may have about Blogger vs. BlogSpot, or WordPress.org vs. WordPress.com – they really are two different services, each using WordPress as the Content Management System (CMS). Ready to get started? Here we go!

Introducing Blogger

Blogger
It’s impossible to talk about BlogSpot without mentioning Blogger, as the two are linked. You sign up for your blog through Blogger, and that’s where your dashboard and site controls are located. However, if you visit your actual blog, you’ll find it’s located at a subdomain of .BlogSpot. For example, if I had a blog called Thrifty Choko, you could find me at http://thriftychoko.blogspot.com/. The names Blogger/BlogSpot are used almost interchangeably; just remember, Blogger is the blogging platform, and .blogspot is the domain where your blog is located.
You can also purchase your own domain name and use it instead of the .BlogSpot domain, for free.
BlogSpot/Blogger is owned by Google.

Introducing WordPress

WordPress
The first thing you need to know about WordPress is that the name is used to refer to several different things:
  • WordPress is an open source Content Management System (CMS) software used to power approximately 25% of all websites.
  • WordPress.org is the official site of the WordPress CMS software. It contains a massive number of free plugins and themes. To start a blog using WordPress as the CMS, you need a premium WordPress theme and a hosting account with a web host provider. This is known as self-hosting.
  • WordPress.com is a site where you can sign up and create your own blog. It uses a customized version of WordPress. You can sign up for a free blog, or there are paid options available. Unless you pay a fee to use your own domain name, your site will appear as a subdomain of .wordpress. For example, http://thriftychoko.wordpress.com.

WordPress.com

So how do these platforms measure up?

If you want to start blogging, you need to know that you’re choosing the right platform. The most important features of a blogging platform are:
  • Ownership – who owns the content on your site?
  • Control – how much control do you have over your site?
  • Monetization – are there restrictions on how you can monetize your site?
  • Appearance – what options do you have to change the appearance of your site?
  • Security – how secure is your site? Who’s responsible for it?
  • Support – when things go wrong, how do you get help?
Let’s compare Blogger, WordPress.com and WordPress.org across these features now and see which one comes out on top!

Ownership

Who owns your site content? Is it you? Most free providers require you to sign their terms of service and they retain the right to close or even delete your blog if you violate the rules. While this possibility may be remote, it should be taken into account when choosing a platform.

Blogger

Blogger is run by Google and, ultimately, Google owns the content. Your blog can be removed for violating the terms of service. However, if you believe that your site has been removed in error, you can appeal.

WordPress.com

Similar to Blogger, WordPress.com is owned by Automattic. When you start your site on WordPress.com you agree to their terms of service. WordPress.com has the power to shut down your site if they believe that you’ve violated the terms of service.

WordPress.org

Unlike the other two platforms, with WordPress.org (self-hosting), you own your content and are solely responsible for it.

And the winner is…

WordPress.org

Control

How much control do you have over your site? Can you access the HTML and make changes? Can you add plugins or change your theme?
Free providers manage your platform for you, they’ll apply updates and fixes; however, they also close off your access to plugins and limit your ability to add functions to your site with code.

Blogger

Blogger gives you access to a minimum number of templates to change the appearance of your site. You can make some changes using HTML and you can also upload new templates to use.
You can’t add plugins to Blogger and are limited in the amount of functionality you can add.

WordPress.com

WordPress.com allows you to access thousands of free themes to change your site’s appearance; however, you can’t add any plugins and your ability to edit your code is limited.

WordPress.org

Self-hosting allows you to do as you please. Free themes, premium themes, plugins, edit the code, dig into the .htaccess files… You can do it all with standard self-hosting.

And the winner is…

WordPress.org

Monetization

Blogging has undergone an evolution over the years. Blogs have become less like public diaries and more like magazines. There are five main ways to make money from your blog:
  1. Ads
  2. Affiliate links
  3. Sponsored posts
  4. Selling a product
  5. Selling a service
Generally, sponsored posts, selling your products, and selling your services requires a high degree of trust and professionalism. Using a subdomain of BlogSpot or WordPress.com doesn’t look as professional as having your own exclusive domain name.

Blogger

It makes sense that Blogger allows you to monetize with AdSense – they’re both under the Google umbrella, after all. You can also use affiliate links on Blogger.
As mentioned above, you’ll have better results with sponsored posts and selling your products and services if you have your own domain name. You’ll need to purchase your own domain name but Blogger allows you to use it for free.

WordPress.com

WordPress.com has a lengthy list of terms for monetizing your site. You can monetize your site using their Ads program but are restricted from using third-party ad programs like Google AdSense. If you want to remove WordPress.com’s own ads from your site, you’ll need to upgrade to a paid plan.
You’re allowed to use affiliate links, with some restrictions on the type. You can also monetize using sponsored posts, but only if your site doesn’t feature primarily sponsored content. And, lastly, you can sell your own products or services.

WordPress.org

You have free rein on WordPress.org to monetize your site however you like. Ads, affiliate links, sponsored posts, selling your own products or services… you can use any and all methods.

And the winner is…

WordPress.org

Appearance

If you want your website to be taken seriously, your design needs to be modern and attractive. How do BlogSpot and WordPress compare?

Blogger

Blogger has a limited number of template options to choose from. They aren’t the most attractive templates; however, there are premium templates you can use that are based on popular WordPress themes. Here’s a list of free premium templates to try.

WordPress.com

Your options depend on your plan with WordPress.com. A basic free account gives you access to thousands of free themes, ranging from modern to retro. With an upgraded account, you’ll also have access to a range of premium themes.

WordPress.org

If you’re self-hosting, you have access to all the free themes on WordPress.org. You can also purchase a premium theme from a trusted theme shop, like us! Premium themes typically give you more control over theme layout and design, along with support from the developers, among other things like plugin integration and security updates.

And the winner is…

WordPress.org

Security

A hacked site can be a nightmare for bloggers and site owners alike. It can destroy your content and make you have to start over or pay a hefty price to get things resolved.
Keeping your software updated and applying patches and fixes can help keep your site secure. Both Blogger and WordPress.com manage this on your behalf.
So, which platform has the best security?

Blogger

Blogger is secured by Google, meaning it’s very secure. You’ll still need to be careful when installing third-party templates and codes to add new gadgets to your site, as it’s possible for these to contain malicious code.

WordPress.com

WordPress.com is proactive about security and are quite secure. WordPress.com has also removed the ability to use plugins, which are a common vulnerability.

WordPress.org

If you’re self-hosting, your security is in your hands. There are steps you can take to make your site more secure; however, there’s still a chance that your site could be hacked. If this happens, it’s your responsibility. Some web hosts will be able to assist you, but you may find you need specialized help.

And the winner is…

Tied between WordPress.com and BlogSpot

Support

Will someone be there for you if things go wrong? Or if you just need a helping hand to set you on the right path? How do BlogSpot and WordPress compare on support?

Blogger

There’s some support available for Blogger. There are extensive FAQs and articles for you to find your own answers. You’ve also got access to a help forum for more personalized assistance.

WordPress.com

WordPress.com has minimal support for free users, however, there are more support options for those on a paid plan. Similar to Blogger, there are extensive FAQs and articles to help you find your own answers.

WordPress.org

The level of customer service you get depends on your web host and your theme developer. Most will provide you with a swift response as well as several options for contacting them including Live Chat, telephone, or email. Most theme shops, ourselves included, provide specialized support for premium themes so you can have a helping hand along the way as you customize your website.

And the winner is…

WordPress.org

Comparison Table


ProsCons
BloggerBloggerMonetization – No restrictions on monetization. Security – Managed by Google.
Cost – Free.
Ownership – Google owns your platform and your work. Control – You have little control over your site. Appearance – Limited number of templates available, however, you can customize these with HTML or upload a premium template. Support – Is limited to an extensive list of FAQs and a help forum.
WordPress.comAppearance – Wide range of free themes available, some premium themes available on paid plans.
Security – Managed by Automattic.
Support – Basic support forum for free users. More support options for customers with a paid plan.
Ownership – Automattic runs and owns the platform you’re using.
Control – You have some control over your site. You can’t install plugins.
Monetization – Restricted to WordAds program for ads.
Cost – Free for basic service, plans start at $3.99/month.
WordPress.orgOwnership – You are solely responsible for your content. Control – You have complete control over your site. You have access to edit your code, change plugins, and more. Monetization – There are no restrictions on monetization. Appearance – Wide variety of free and premium themes to choose from.
Support – Provided by your web host. Most offer a variety of contact methods including Live Chat.
Security – You are responsible for your own security.
Cost – Varies depending on your web host and the type of hosting you purchase.

Check out the Infographic: Blogspot vs. WordPress

The Final Verdict

So, who wins?
WordPress.org was the clear winner. However, the battle for second place was a little closer between Blogger and WordPress.com. BlogSpot came out on top in cost and monetization, whereas WordPress.com came out on top in appearance.
Ultimately, the decision of which platform to use is up to you and what you want in a blogging platform. If you’re just getting started, you might want to start with a free BlogSpot or WordPress.com site. On the other hand, if you plan on monetizing your site in the future or want more customization options, going with WordPress as a CMS and using your own premium WordPress theme on your own domain might be a worthwhile endeavor.
Over to you – which platform are you using for your blog? Or, if you haven’t started one yet, which one will you choose?